Page History
...
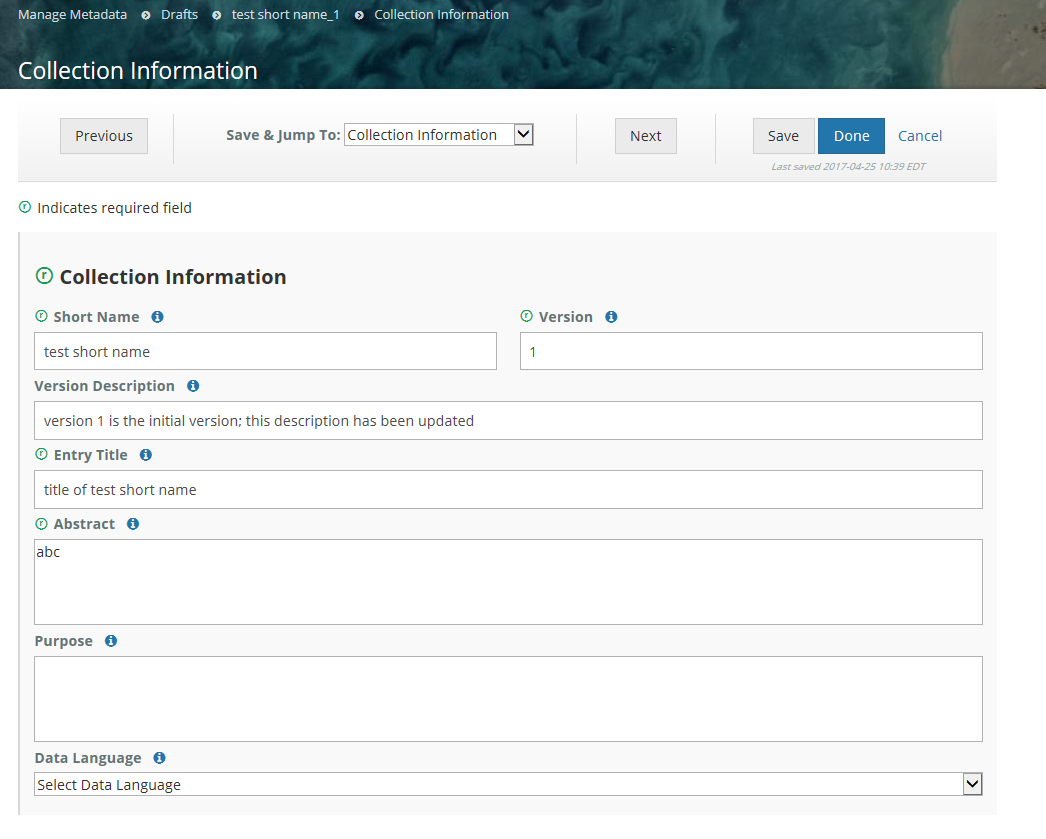
2. Begin filling in metadata fields for your draft collection record. Use the information icons (blue 'i') to get information about what fields mean and how to format their values.
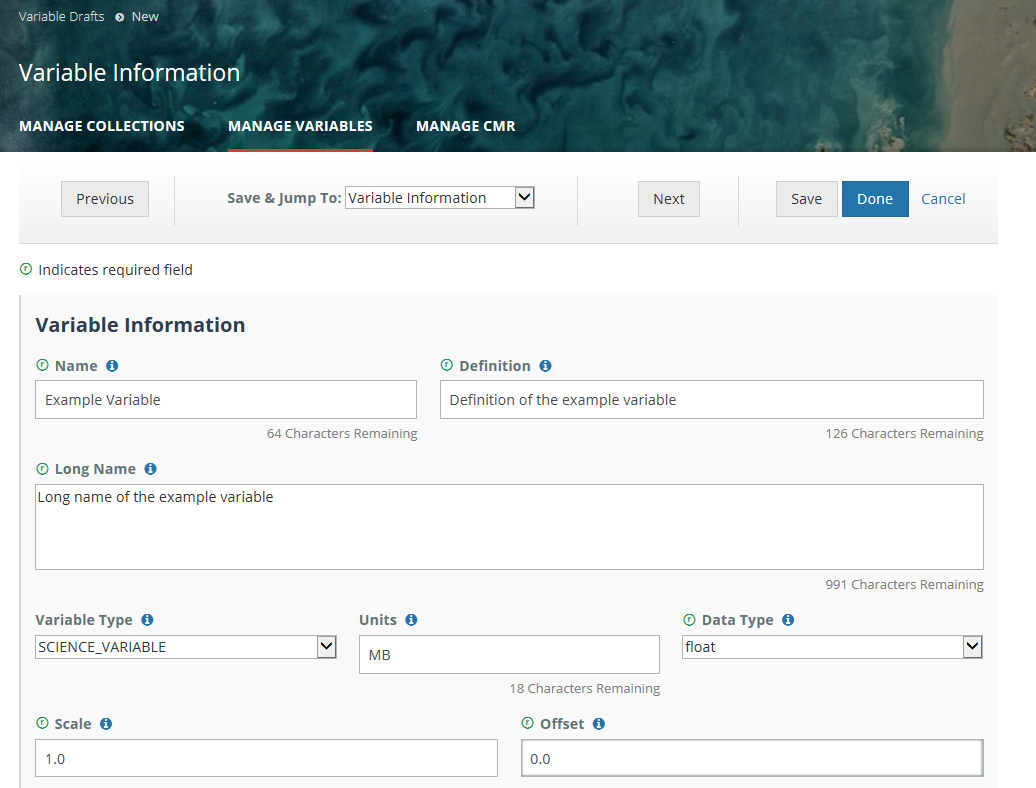
3. Navigate from form to form using the Previous or Next buttons, or by choosing the next form to edit from the pull-down list at 'Save & Jump To:'. You may work on forms in any order. When you move from one form to another, your input from the previous form will be saved in your draft record.


4. Explicitly Save form input (within a session or at the end of a session) with the 'Save' button; Finish editing your draft record using the 'Done' button.
...
5. Follow progress of your draft record on the progress panel:
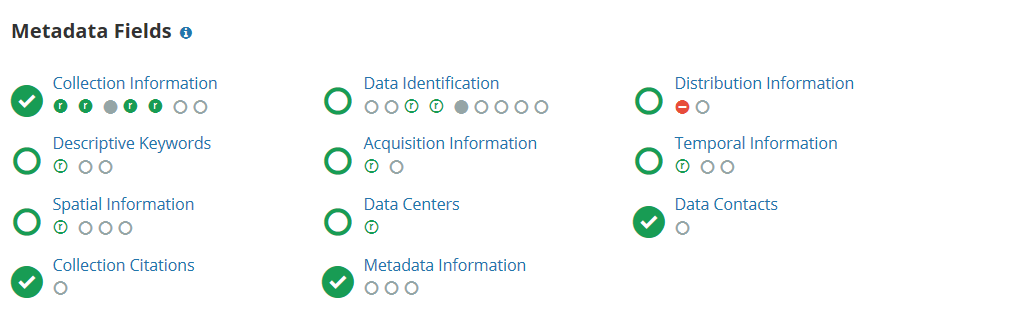

The icons on the progress panel have the following meanings:
...
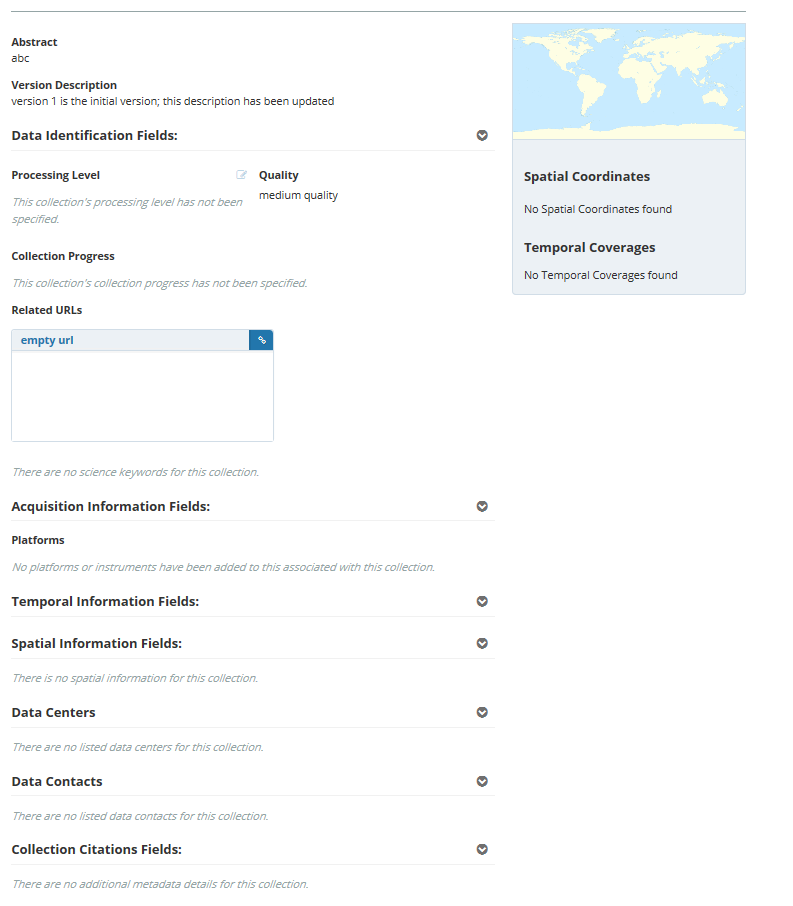
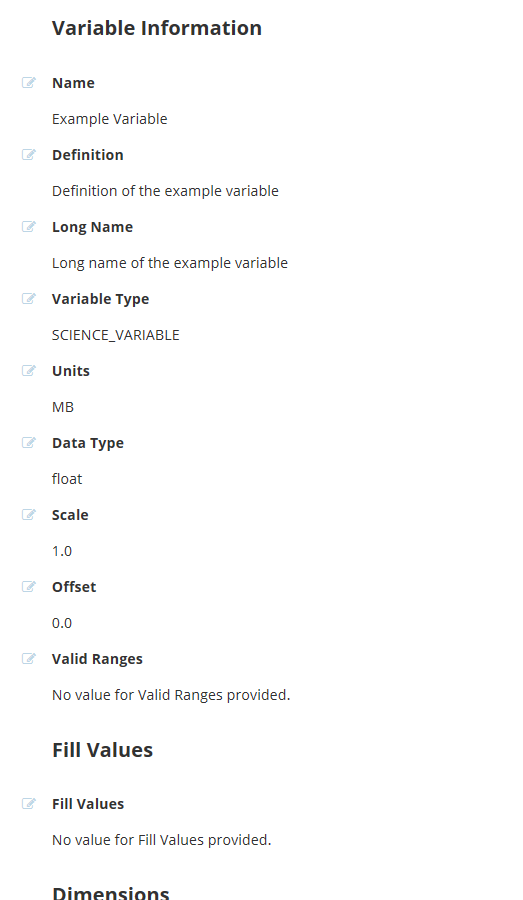
6. View a HTML rendering of your variable your collection record on the 'preview panel':
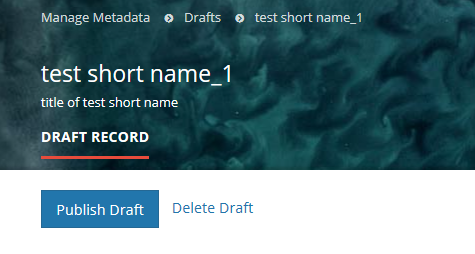
7. When all Required fields are complete with no validation errors (red icon) showing on the progress panel, you are ready to Publish your record to the CMR.
7. Special NOTES when creating or editing a collection level record:
a. To have the NRT (Near Real Time) badge appear for the collection on the EDSC, set Collection Type = Near Real Time on the Data Information Form.
b. On the Temporal Extent form, Ends at Present should be set to False if there is an end date for the collection.
c. NASA data centers are strongly encouraged to provide DOI information for the Collection on the 'Collection Information' form.
8. When all Required fields are complete with no validation errors (red icon) showing on the progress panel, you are ready to Publish your record to the CMR.
Click on the 'Publish Click on the 'Publish Variable Draft' button above the Progress Panel on the draft record page:
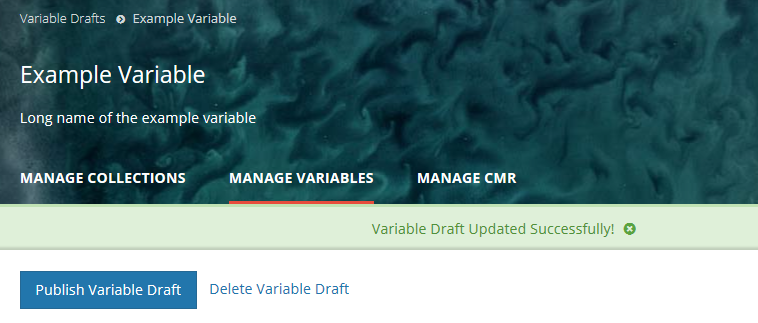
8. You will see a green banner indicating that your variable your collection record has been successfully published to the CMR. You will also receive an email stating that your record has been published, and providing the 'concept id' (CMR identifier) for the published record. You may use that concept id to search for your record on the MMT or Earthdata Search.
Find and view variable records in the CMR
...
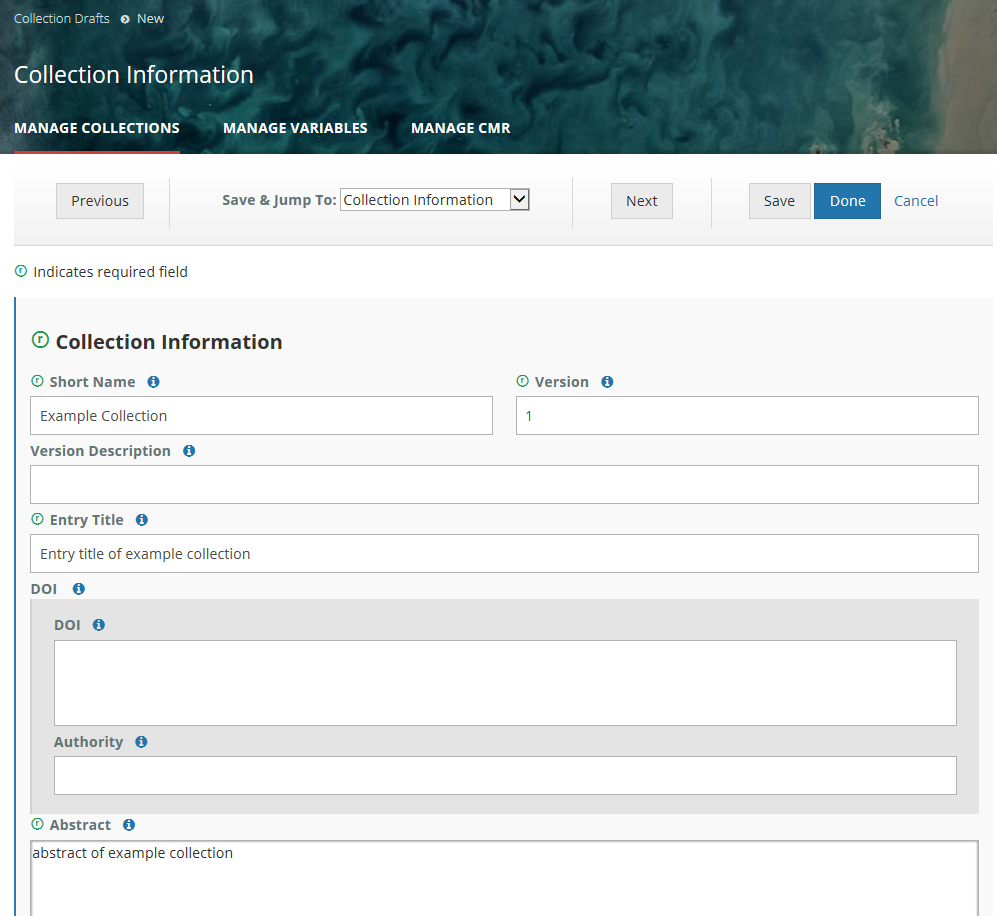
2. Begin filling in metadata fields for your draft variable record. Use the information icons (blue 'i') to get information about what fields mean and how to format their values.
3. Navigate from form to form using the Previous or Next buttons, or by choosing the next form to edit from the pull-down list at 'Save & Jump To:'. You may work on forms in any order. When you move from one form to another, your input from the previous form will be saved in your draft record.
4. Explicitly Save form input (within a session or at the end of a session) with the 'Save' button; Finish editing your draft record using the 'Done' button.
...
NOTE: When you are working with a draft collection draft variable record, all 'Save' and 'Done' operations update the draft record in the MMT database, not in the CMR, i.e., DRAFT records are not stored in the CMR. Your draft collection draft variable record will not be ingested into the CMR until you click on the 'Publish DraftVariable Draft' button in step 7 below.
5. Follow progress of your draft record on the progress panel:
The icons on the progress panel have the following meanings:
...
6. View a HTML rendering of your collection record on the 'preview panel':
7. Special NOTES when creating or editing a collection level record:
a. To have the NRT (Near Real Time) badge appear for the collection on the EDSC, set Collection Type = Near Real Time on the Data Information Form.
b. On the Temporal Extent form, Ends at Present should be set to False if there is an end date for the collection.
8. When all Required fields are complete with no validation errors (red icon) showing on the progress panel, you are ready to Publish your record to the CMR.
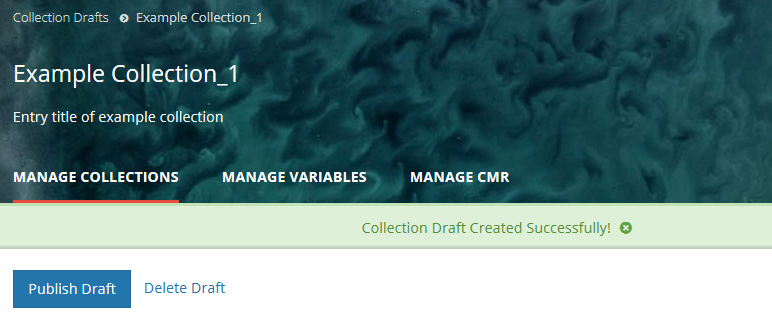
Click on the 'Publish Draft' button above the Progress Panel on the draft record page:
9. You will see a green banner indicating that your record has been successfully published to the CMR. You will also receive an email stating that your record has been published, and providing the 'concept id' (CMR identifier) for the published record. You may use that concept id to search for your record on the MMT or on the Earthdata Search Client.
...
7. When all Required fields are complete with no validation errors (red icon) showing on the progress panel, you are ready to Publish your record to the CMR.
Click on the 'Publish Variable Draft' button above the Progress Panel on the draft record page:
8. You will see a green banner indicating that your variable record has been successfully published to the CMR. You will also receive an email stating that your record has been published, and providing the 'concept id' (CMR identifier) for the published record. You may use that concept id to search for your record on the MMT.
Find and view variable records in the CMR
Find and view variable records in the CMR
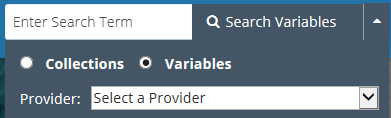
Use the 'Search Variables ' interface in the upper right corner of the MMT banner:
Find records based on a keyword
Enter a search term (a Variable Name, Variable Long Name, a CMR concept id, or a science keyword) in the white 'Enter Search Term' box, and click on 'Search Variables'.
A table of CMR variable records which match the search term will be presented (sorted by Name).

To view an html representation of the metadata for any collection record in the search results table, click on the Short Name of the collection.
Use the Find interface in the upper right corner of the MMT banner:

Find records based on a keyword
Enter a search term (e.g., a Shortname, a CMR concept id, a science keyword) in the white 'Enter Search Term' box, and click on 'Find'.
...
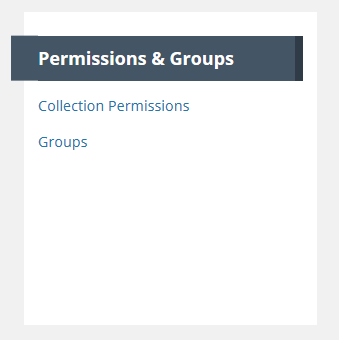
- On the 'Manage CMR' dashboard, under 'Permissions & Groups', click on 'Groups'
At the top of the Group page, click on 'Create a Group'
...
- On the 'Manage CMR' dashboard, under 'Permissions & Groups', click on 'Groups'
2. A table of groups that you are permitted to see will be displayed. You may filter that table by Provider
...
- On the 'Manage CMR' dashboard, under 'Permissions & Groups', click on 'Groups'
2. A table of groups that you are permitted to see will be displayed. You may filter that table by Provider
...
- On the 'Manage CMR' dashboard, under 'Permissions & Groups', click on 'Groups'
2. A table of groups that you are permitted to see will be displayed. You may filter that table by Provider
...
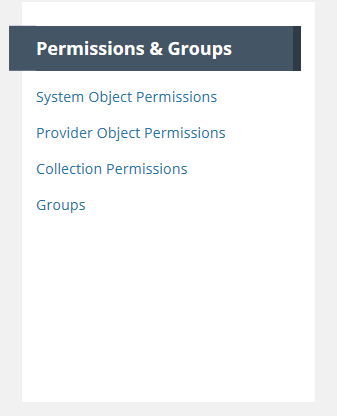
- On the 'Manage CMR' dashboard, under 'Permissions & Groups', click on 'Collection Permissions'
2. On the Collection Permissions page, click on 'Create a Permission'.
...
- On the 'Manage CMR' dashboard, under 'Permissions & Groups', click on 'Collection Permissions'
2. On the list of Collection Permissions for your provider, choose the Collection Permission you wish to update by clicking on the Edit Action in the row for the permission, or by clicking on the permission name, and then clicking the Edit button on the display page for the permission.
...
- On the 'Manage CMR' dashboard, under 'Permissions & Groups', click on 'Provider Object Permissions'
2. A table showing all Groups for your provider will be displayed:
...
- On the 'Manage CMR' dashboard, under 'Permissions & Groups', click on 'System Object Permissions'
Manage Ordering for my provider
...
Overview
Content Tools