Versions Compared

Key

  • This line was added.
  • This line was removed.
  • Formatting was changed.

...

UI Expand
titleESRI ArcGIS Online

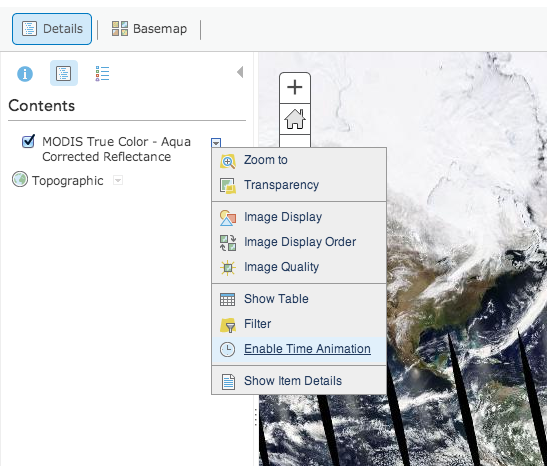
GIBS imagery layers can be imported into ESRI's ArcGIS Online in one of three ways: as a predefined layer, "a Tile Layer", or through an ESRI-run relay service which adds an ArcGIS Server interface layer in front of GIBS.

Adding GIBS layers from a list of ones predefined by ESRI


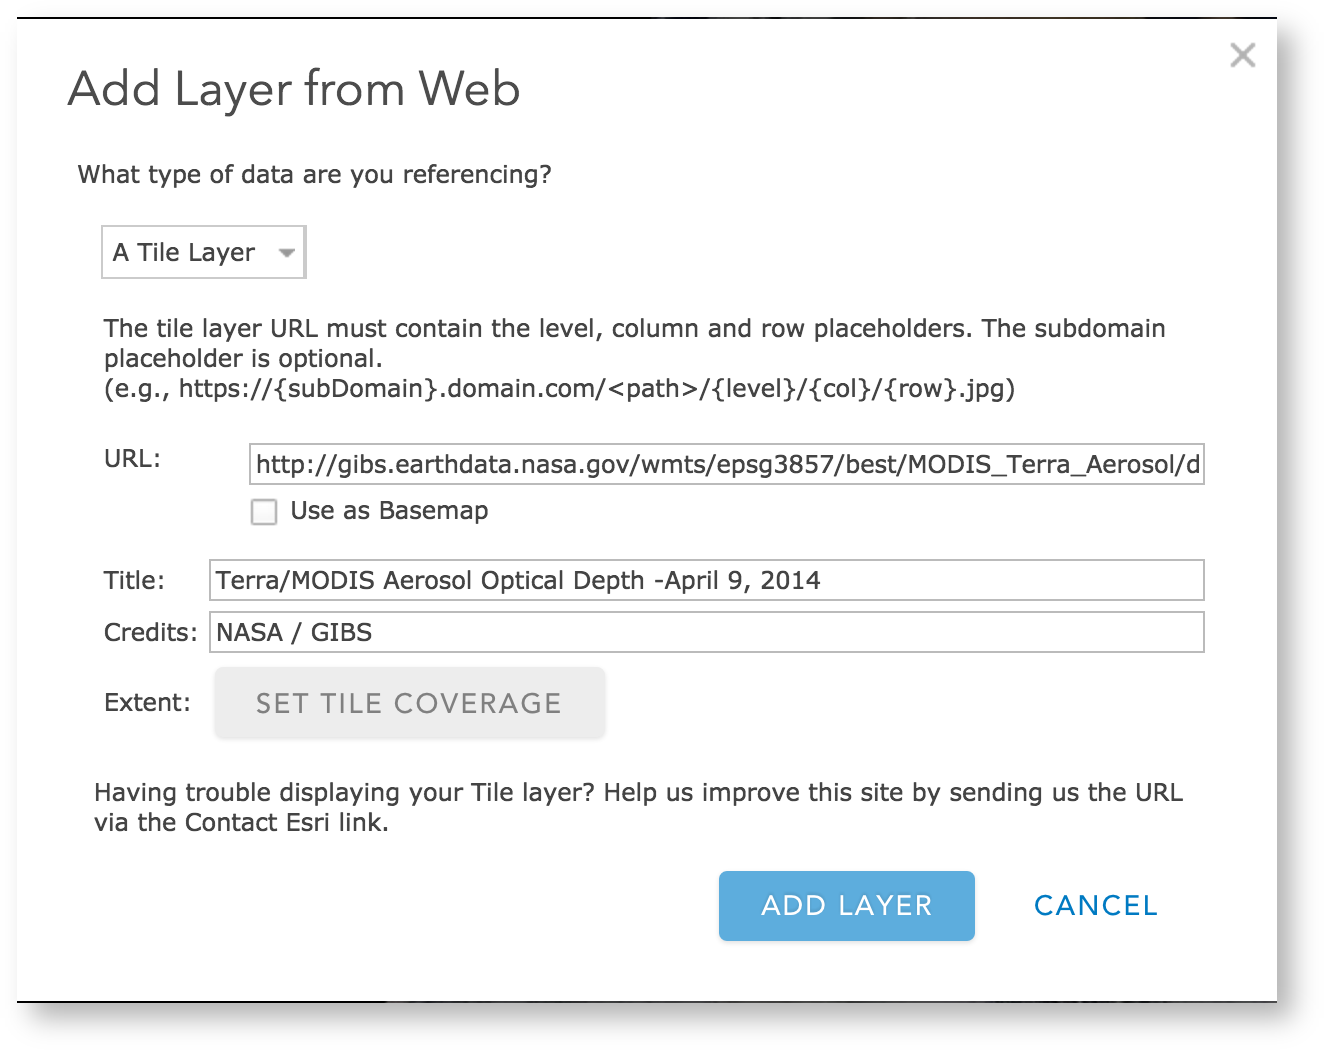
Adding GIBS layers to ArcGIS Online as "A Tile Layer"

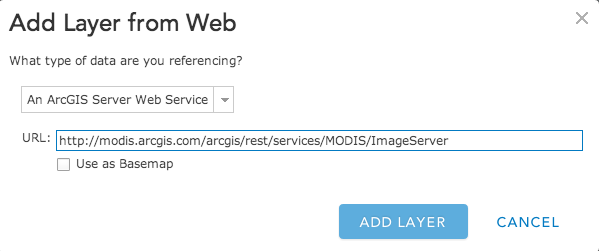
Adding GIBS layers to ArcGIS Online as "An ArcGIS Server Web Service"

  • Create a new map or open an existing one in ArcGIS Online
  • Click the "Modify Map" button in the upper right corner
  • Click the "Add" menu on the left, then "Add Layer from Web"
  • Change the service drop down menu to "An ArcGIS Server Web Service"
  • Add the following URL: http://modis.arcgis.com/arcgis/rest/services/MODIS/ImageServer and click "Add Layer"
  • The default layer is Terra/MODIS Corrected Reflectance and is... difficult to change to others. The time is adjustable at the bottom of the screen


UI Expand
titleIntergraph Geospatial Portal

Requirements

  • None

Usage

  1. Browse to the Intergraph Geospatial Portal
  2. Click "Data Sources" in large right-hand window
  3. Click 2nd tool icon from left (mouse-over = "Define a data source")
  4. A dialog window will appear.  Select WMTS in Type list in left column
  5. Enter "http://gibs.earthdata.nasa.gov/wmts/epsg4326/best/wmts.cgi" in URL: box
  6. Click "Register and choose layers"
  7. Back in the main window, click the "Data Sources" tab in the left-hand "Map Content" area.
  8. Click + to expand the "NASA Global Imagery Browse Services for EOSDIS" data source.
  9. Select your layers of choosing (e.g. one of our "base layers" and one of our "overlays")
  10. Click "Display" (you'll see "today")
  11. Click "Time" in large right-hand window
  12. Enjoy!


Screenshots

UI Expand
titleCartoDB

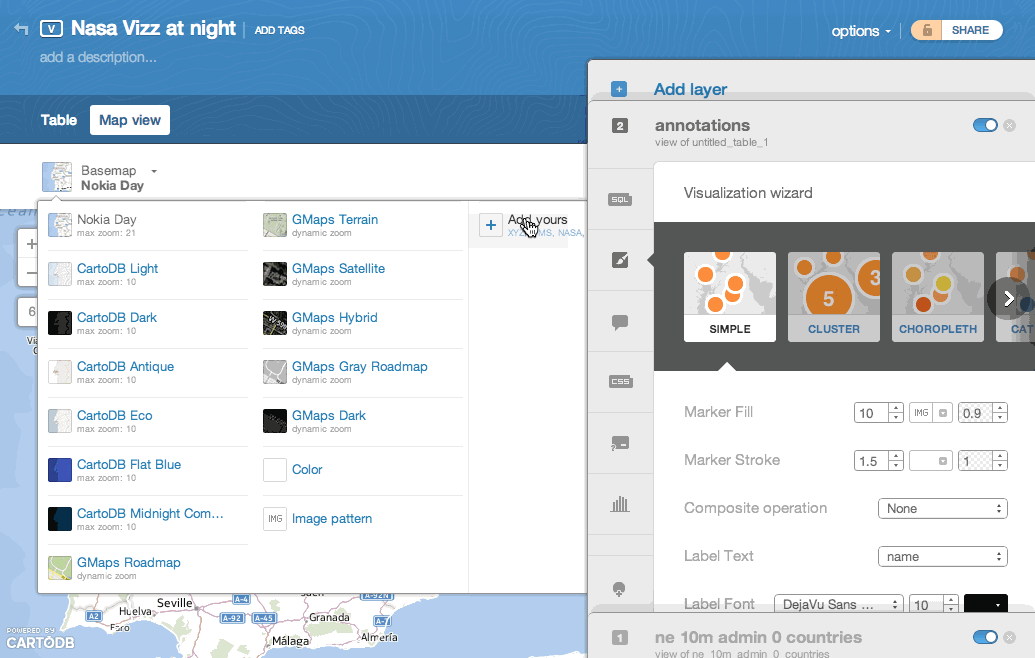
GIBS products can be used directly from within CartoDB. This can be done by adding a basemap from either “NASA” or a generic X/Y/Z template.

Method 1: adding a "NASA" basemap:

  • While in "Map view", click the "Basemap" drop-down menu and select "Add yours".
  • Select the "NASA" tab, then choose a date. Note that this currently defaults to either the Terra/MODIS Corrected Reflectance (True Color) product or the Suomi NPP/VIIRS/Earth Observatory Earth at Night 2012 layer. To use other GIBS products, see the method below for adding a layer via a generic X/Y/Z template.


Method 2: adding a GIBS layer from a generic X/Y/Z template

  • While in "Map view", click the "Basemap" drop-down menu and select "Add yours".
  • Select the "XYZ" tab
  • Determine which GIBS imagery product you'd like to add, then construct a URL template as follows:
    • http://gibs.earthdata.nasa.gov/wmts/epsg3857/best/<product_name>/default/<date>/<zoom_levels_supported>/{z}/{y}/{x}.<format>
    • Sample templates:

      • http://gibs.earthdata.nasa.gov/wmts/epsg3857/best/MODIS_Terra_Land_Surface_Temp_Day/default/2014-04-09/GoogleMapsCompatible_Level7/{z}/{y}/{x}.png

      • http://gibs.earthdata.nasa.gov/wmts/epsg3857/best/MODIS_Aqua_CorrectedReflectance_Bands721/default/2014-04-09/GoogleMapsCompatible_Level9/{z}/{y}/{x}.jpg


...

UI Expand
titleGoogle Earth

GIBS can generate KML files to be used with Google Earth. Those KMLs include pointers to GIBS imagery via the NetworkLink keyword. Users have two options on loading KML files into Google Earth as described below.

Requirements

Usage (Generate/Download KML file)

Using the information on generating KMLs, you can load that downloaded file from within Google Earth (File | Open) or usually by simply double-clicking on the KML file itself. The layer will show up in the "Temporary Places" within the "Places" window.

Usage (Load from within Google Earth)

After launching Google Earth, choose the "Network Link" item from the "Add" menu. Choose whatever Name you wish and in the "Link" field, insert the appropriate link (e.g., http://gibs.earthdata.nasa.gov/twms/epsg4326/best/kmlgen.cgi?layers=MODIS_Terra_CorrectedReflectance_TrueColor&time=2012-06-21). The list of available layers can be found here. For more details on how to compose a proper KML generation request from the GIBS server, see here.


Limitations (both methods):

  • Due to the way NetworkLink is handled in Google Earth for global datasets, you may need to zoom out to a more "global" view before imagery begins loading.
  • When using a KML that contains multiple time steps, the time slider by default usually attempts to display the entire time range simultaneously; this can cause a Z-fighting problem where all time steps are fighting to be shown. To correct the problem, narrow the range of currently-shown time to a single day using the time widget.
UI Expand
titlePerceptive Pixel Client

Perceptive Pixel, a company that makes high-end touch displays such as CNN's Magic Wall, includes a built in WMS client that can be configured to use TWMS. The FeltBoard application allows for a natural user interface to interact with maps and allows arbitrary map layer sizing, rotations, intersections, as well as annotations.

Requirements

  • Perceptive Pixel Display + FeltBoard Application

Usage

The FeltBoard application requires the server2.xml file to be updated with the WMS endpoint for each layer. The list of available layers can be found here. The <base_deg> is the size of the most coarse tile in degrees and must be a divisor of 180. The <depth> tag is set to the number of levels in the tile pyramid. This value may not be the entire tile pyramid, rather, the number of levels starting with the tile level that <base_deg> defines. The <wms_options> can be used to define a specific date.

Code Block
<MapTileServer server_code="MODIS_Aqua_CorrectedReflectance_TrueColor" server_type="WMSMapServer">
	<server_code>MODIS_Aqua_CorrectedReflectance_TrueColor</server_code>
	<server_name>MODIS AQUA</server_name>
	<db_url>http://gibs.earthdata.nasa.gov/twms/epsg4326/best/twms.cgi</db_url>
	<base_deg>36</base_deg>
	<depth>6</depth>
	<im_format>Image::IMG_JPG</im_format>
	<boundary>((-180,0),(180,180))</boundary>
	<basis>Projection::B_SPHERICAL</basis>
	<projection>Projection::P_MERCATOR</projection>
	<wms_layers>MODIS_Aqua_CorrectedReflectance_TrueColor</wms_layers>
	<wms_styles></wms_styles>
	<wms_options>&time=2012-06-18</wms_options>
</MapTileServer>

Screenshots