- This page describes how to use the Metadata Management Tool (MMT) to:
- perform functions related to Create/Read/Update/Delete of CMR Metadata Records
- perform functions related to managing permissions and usage of CMR metadata.
Accessing the MMT
URLs for the Metadata Management Tool
SIT environment: https://mmt.sit.earthdata.nasa.gov
UAT environment: https://mmt.uat.earthdata.nasa.gov
PROD environment: https://mmt.earthdata.nasa.gov
Ensure your Earthdata Login userid for the appropriate environment (SIT, UAT, PROD) is a member of a provider group that has both 'Provider Context' and 'Provider Object ACLs' permissions for your provider.
(see the Administrator for your provider, or contact the CMR OPS team support@earthdata.nasa.gov)
Login using your Earthdata Login userid and password for the appropriate environment (SIT, UAT, PROD)

Change Provider
- Pull down the options beside your login name in the upper right corner of the MMT page, and click on Change Provider.
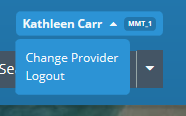
2. Select a new provider from the pull-down of the available providers for your userid
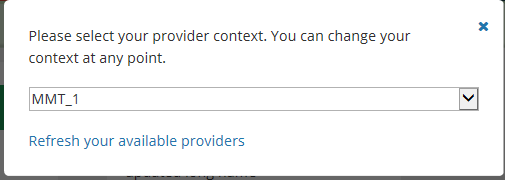
3. If you have recently been granted access to a new provider, you may need to click on 'Refresh your available providers' so that the new provider appears on the pull-down list.
Logout of the MMT
Pull down the options beside your login name in the upper right corner of the MMT page, and click on Logout.
Manage Collection Metadata for my provider
Required Permissions
To create, update, or delete collection metadata records in the CMR, your login user id must be a member of a group with Provider Object Permissions which include Ingest Operations Read and Update.
See your provider Administrator if you are not sure whether your user id has the correct permissions for these operations. The provider Administrator should refer to the "Manage 'Provider Object Permissions' for a user group" section below to assign these permissions.
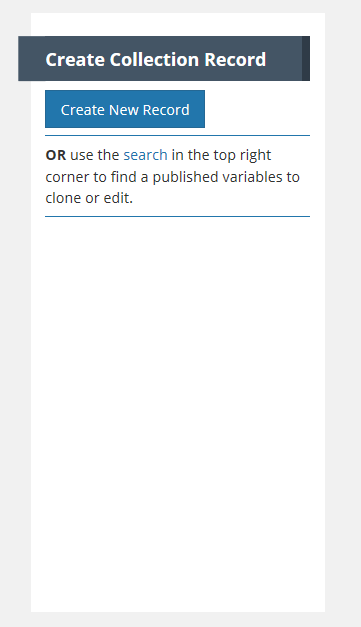
Create a collection record in the CMR for my provider
1. On the 'Manage Collections' dashboard,

click on 'Create New Record'. A draft collection record will be created.
2. Begin filling in metadata fields for your draft collection record. Use the information icons (blue 'i') to get information about what fields mean and how to format their values.
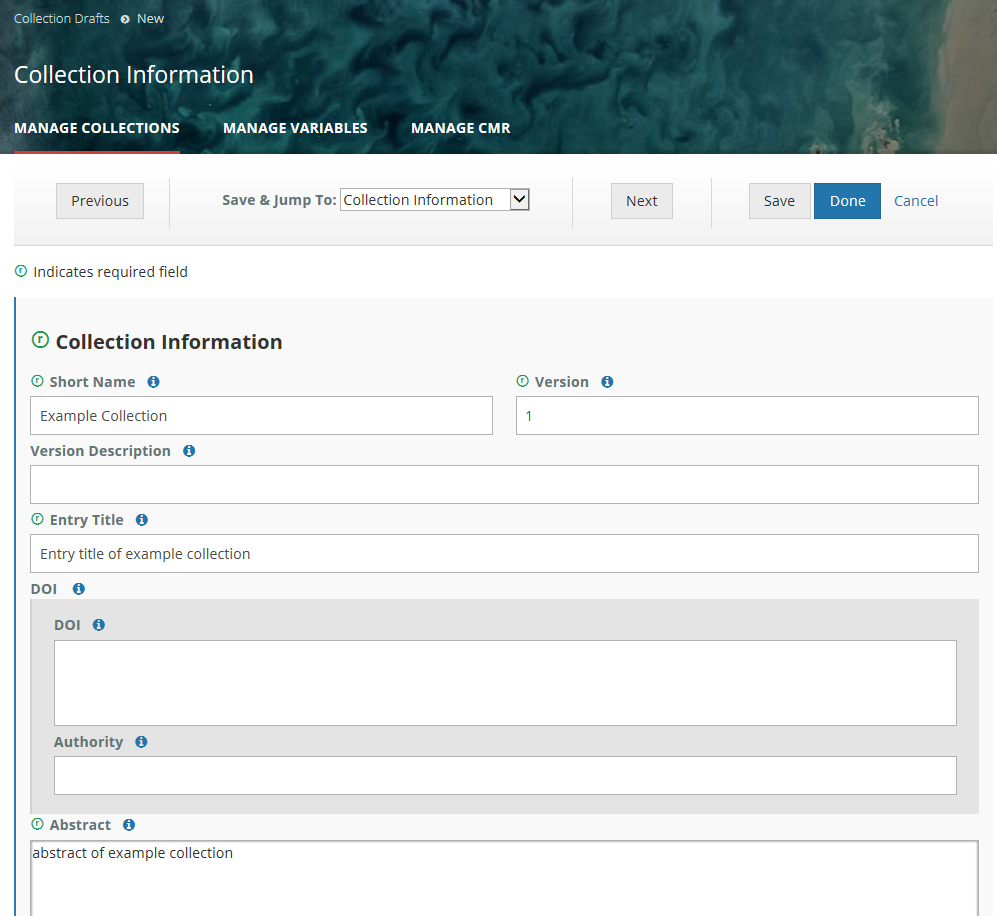
3. Navigate from form to form using the Previous or Next buttons, or by choosing the next form to edit from the pull-down list at 'Save & Jump To:'. You may work on forms in any order. When you move from one form to another, your input from the previous form will be saved in your draft record.

4. Explicitly Save form input (within a session or at the end of a session) with the 'Save' button; Finish editing your draft record using the 'Done' button.

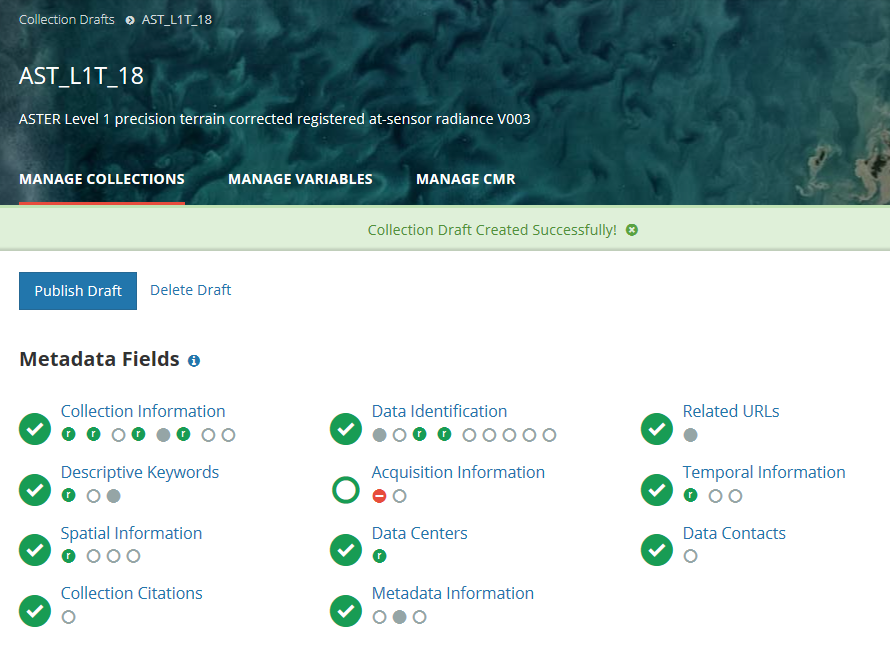
NOTE: When you are working with a draft collection record, all 'Save' and 'Done' operations update the draft record in the MMT database, not in the CMR, i.e., DRAFT records are not stored in the CMR. Your draft collection record will not be ingested into the CMR until you click on the 'Publish Draft' button in step 8 below.
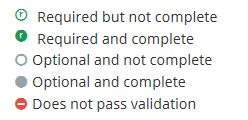
5. Follow progress of your draft record on the progress panel:
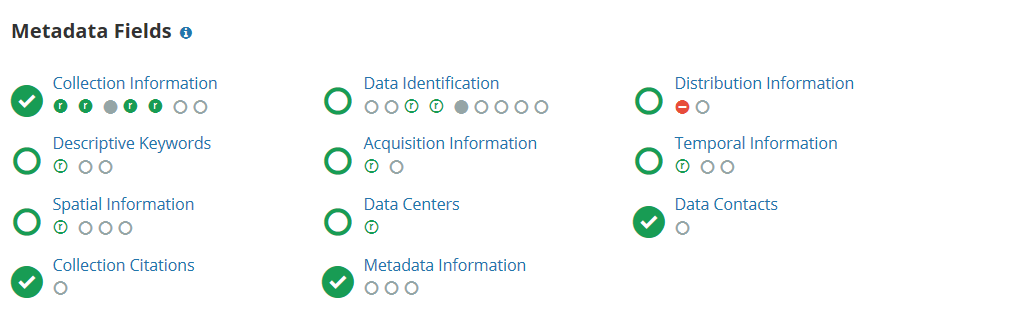
The icons on the progress panel have the following meanings:
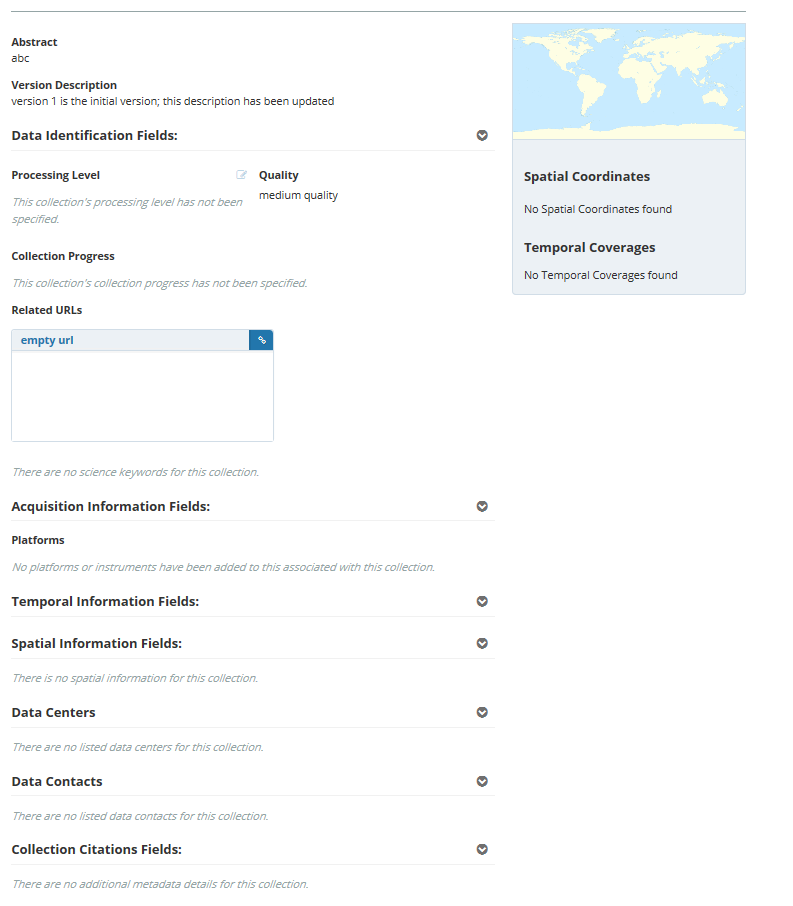
6. View an HTML rendering of your collection record on the 'preview panel':
7. Special NOTES when creating or editing a collection level record:
a. To have the NRT (Near Real Time) badge appear for the collection on the Earthdata Search Client, set Collection Type = 'Near Real Time' on the Data Information Form.
b. On the Temporal Extent form, Ends at Present should be set to False if there is an end date for the collection.
c. NASA data centers are strongly encouraged to provide DOI information for the Collection on the 'Collection Information' form.
8. When all Required fields are complete with no validation errors (red icon) showing on the progress panel, you are ready to Publish your record to the CMR.
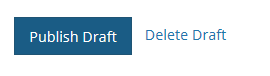
Click on the 'Publish Draft' button above the Progress Panel on the draft record page:
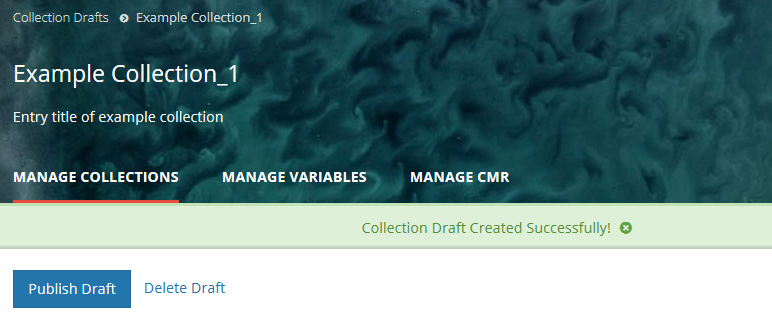
9. You will then see a green banner indicating that your collection record has been successfully published to the CMR. You will also receive an email stating that your record has been published, and providing the 'concept id' (CMR identifier) for the published record. You may use that concept id to search for your record on the MMT or on the Earthdata Search Client.
Find and view collection records in the CMR
Use the 'Search Collections ' interface in the upper right corner of the MMT banner:
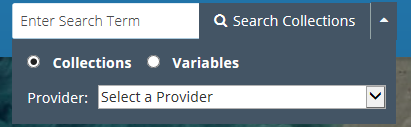
Find records based on a keyword
Enter a search term (e.g., Short Name, Entry Title, a CMR concept id, a science keyword) in the white 'Enter Search Term' box, and click on 'Search Collections'.
A table of CMR collection records which match the search term will be presented (sorted by Entry Title).
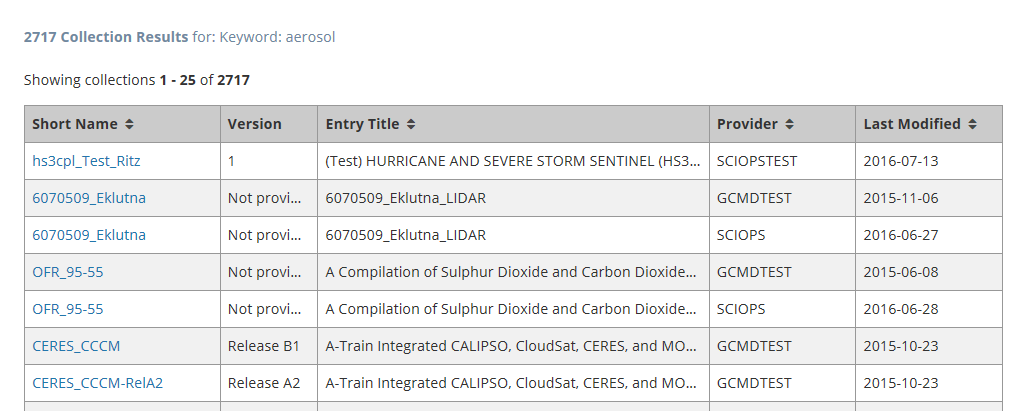
To view an html representation of the metadata for any collection record in the search results table, click on the Short Name of the collection.
Find all collection records for a provider
Select a provider from the 'Select a Provider' drop-down list, and then click on 'Search Collections'.
A table of all CMR collection records for the selected provider will be presented (sorted by Entry Title).

To view an html representation of the metadata for any collection record in the search results table, click on the Short Name of the collection.
Update a collection record in the CMR for my provider
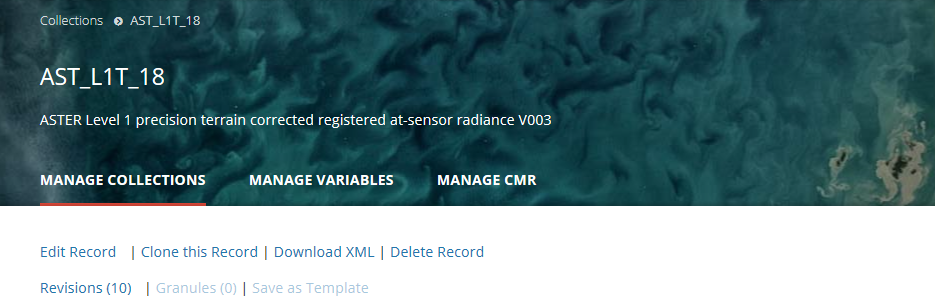
1. Find the collection record using the instructions above (Find and View Collections in the CMR), and click on the Short Name of the collection to view the collection record page.
2. At the top of the collection record page, click on 'Edit Record'
3. A new draft of this record will be created in the MMT database. The MMT will display the progress panel (and html representation) for the draft record.
4. On the progress panel, click on any section to begin editing the draft record. Use the progress panel and navigation buttons described above (Create a collection record in the CMR for my provider) to update the metadata in the draft record.
5. When you have finished editing the draft record, publish it to the CMR by clicking on the Publish Draft button above the progress panel. This will create a new revision of the collection record in the CMR. The CMR stores up to 10 revisions of each collection record. When an 11th revision is created, the first revision is deleted, and so on. Each revision of a collection record has the same concept id as the original collection record.
Clone and edit a collection record in the CMR for my provider
1. Find the collection record using the instructions above (Find and View Collections in the CMR), and click on the Short Name of the collection to view the collection record page.
2. At the top of the collection record page, click on 'Clone this Record'
3. A draft of a clone of this record will be created in the MMT database. The MMT will display the progress panel (and html representation) for the draft record (the clone).
Since collection Short Names must be unique, the clone is initiated with a blank short name. The Entry Title of the clone will be initialized to '<entry title of the original record' - Cloned'. You may edit the record to change the default entry title of the clone.
NOTE: A prompt to enter a new short name for the clone appears in the blue bar, and the progress panel indicates that the Short Name has not yet been filled in.
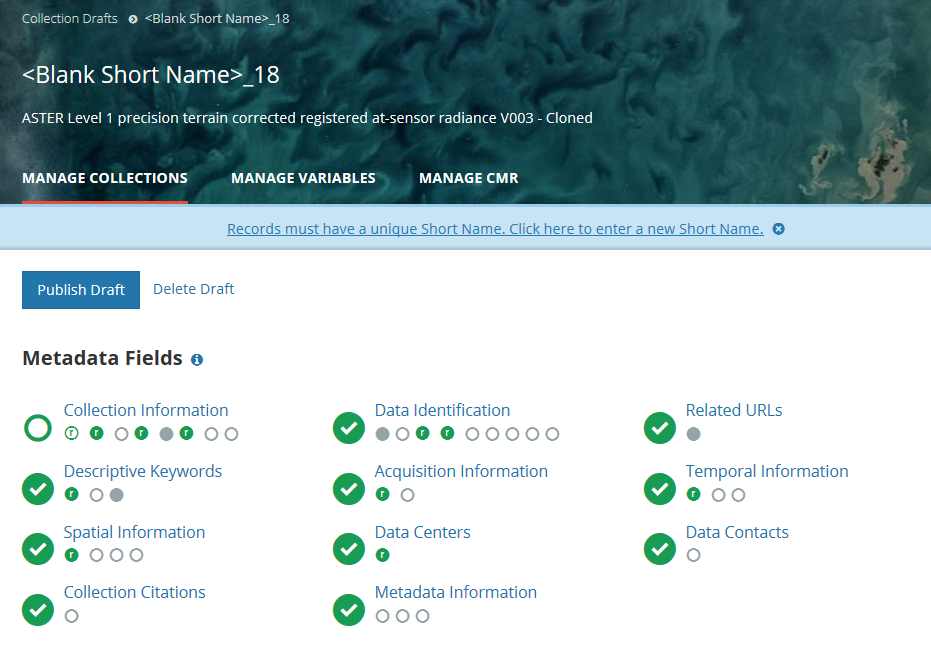
4. On the progress panel, click on any section to begin editing the draft record (the clone). You must enter a new Short Name for the clone. Use the progress panel and navigation buttons described above (Create a collection record in the CMR for my provider) to update the metadata in the draft record.
5. When you have finished editing the draft record (the clone), publish it to the CMR by clicking on the Publish Draft button above the progress panel. The clone will be stored as a new collection record in the CMR, with a different concept id from the original record.
Download XML for a collection record in the CMR
1. Find the collection record using the instructions above (Find and View Collections in the CMR), and click on the Short Name of the collection to view the collection record page.
2. At the top of the collection record page, click on 'Download XML'
3. You will see a pop-up window asking you to choose the format in which you would like to download the collection metadata.
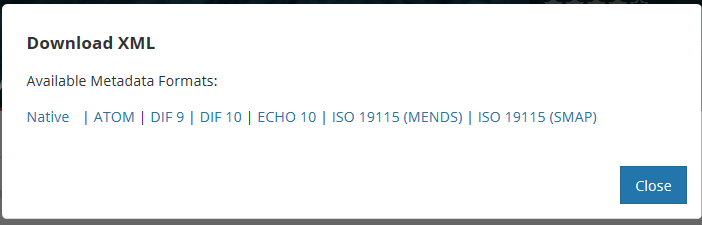
4. Click on the format that you would like. Your browser and local machine will now prompt you through the download process.
Delete a collection record in the CMR for my provider
1. Find the collection record using the instructions above (Find and View Collections in the CMR), and click on the Short Name of the collection to view the collection record page.
2. At the top of the collection record page, click on 'Delete Record'
3. You will see a pop-up message asking you to confirm the record deletion.
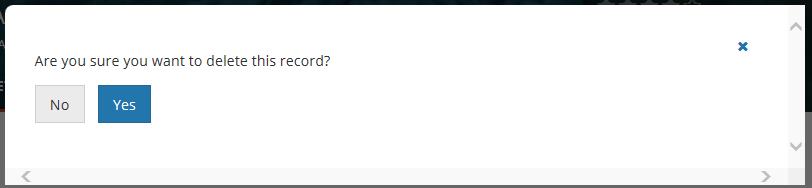
4. Click on Yes to delete the record. The MMT will then display a 'Collection Deleted Successfully!' message, as well as the revision history for the deleted record.
The CMR will create a final revision for the deleted record, which is called a tombstone.

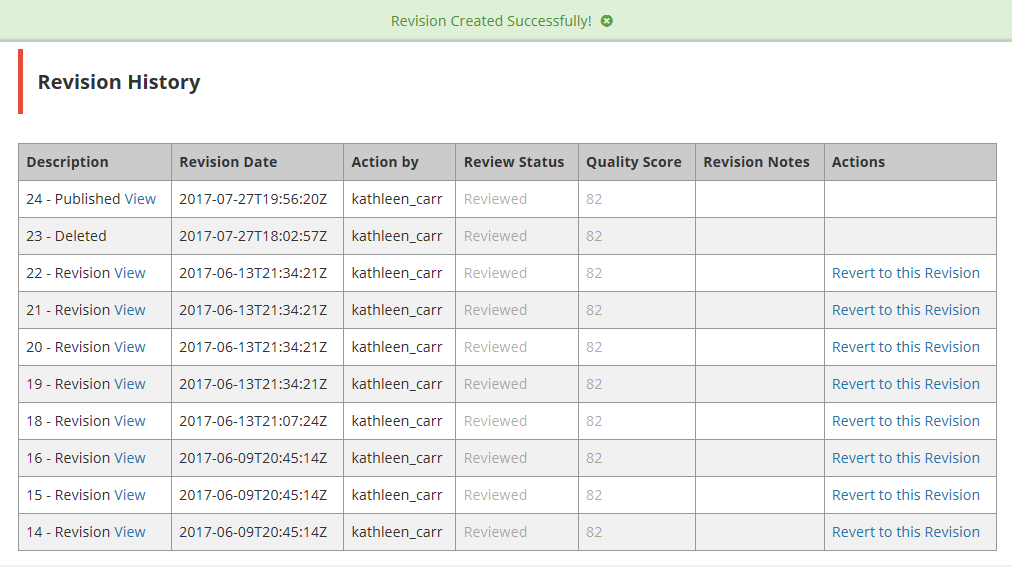
5. NOTE that you can immediately restore the deleted record from one of the revisions on this Revision History table, but once you have moved to a new page on the MMT, you will no longer be able to find the deleted record to restore it.
If you restore the record from this table, you will see a new revision history, showing the deletion as one of the revisions:
Revert to a previous revision of a collection record in the CMR for my provider
1. Find the collection record using the instructions above (Find and View Collections in the CMR), and click on the Short Name of the collection to view the collection record page.
2. At the top of the collection record page, click on 'Revisions (<number of revisions>)'
3. A table of the (up to) 10 most recent revisions of the collection record will be displayed.
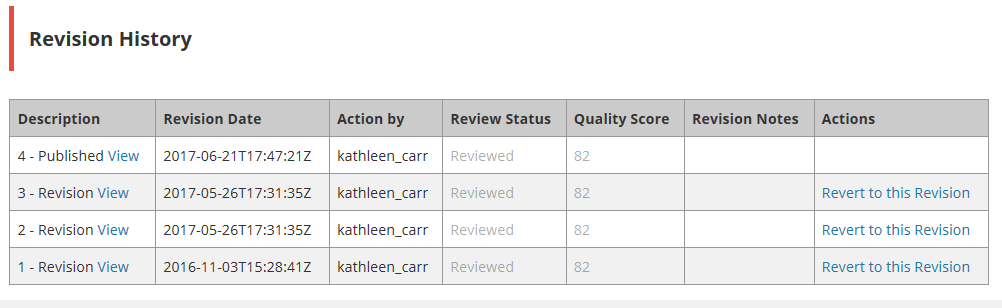
4. You may View previous revisions of the record by clicking on the 'View' link next to the Revision Description. After you determine which revision you want to revert to, click on 'Revert to this Revision' in the Actions column for that revision.
You will see a pop-up message asking you to confirm the action:
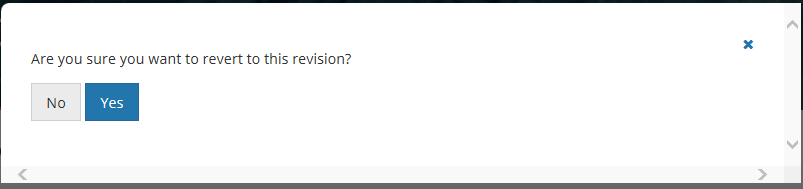
5. Click on Yes to revert to the selected previous revision of the record. The MMT will then display a 'Revision Created Successfully!' message, as well as the new revision history for the record.
If there were n revisions before you reverted to a previous revision, there will now be n+1 revisions, and the n+1st revision will be identical to the previous revision that you selected to revert to.

Manage Variable Metadata for my provider
Required Permissions
To create, update, or delete variable metadata records in the CMR, or to associate / disassociate variables with collections, your login user id must be a member of a group with Provider Object Permissions which include Ingest Operations Read and Update.
See your provider Administrator if you are not sure whether your user id has the correct permissions for these operations. The provider Administrator should refer to the "Manage 'Provider Object Permissions' for a user group" section below to assign these permissions.
Create a variable record in the CMR for my provider
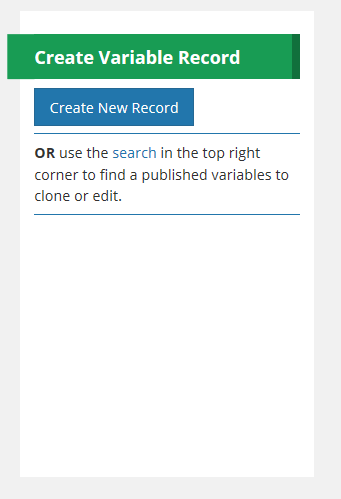
1. On the 'Manage Variables' dashboard,

click on 'Create New Record'. A draft variable record will be created.
2. Begin filling in metadata fields for your draft variable record. Use the information icons (blue 'i') to get information about what fields mean and how to format their values.
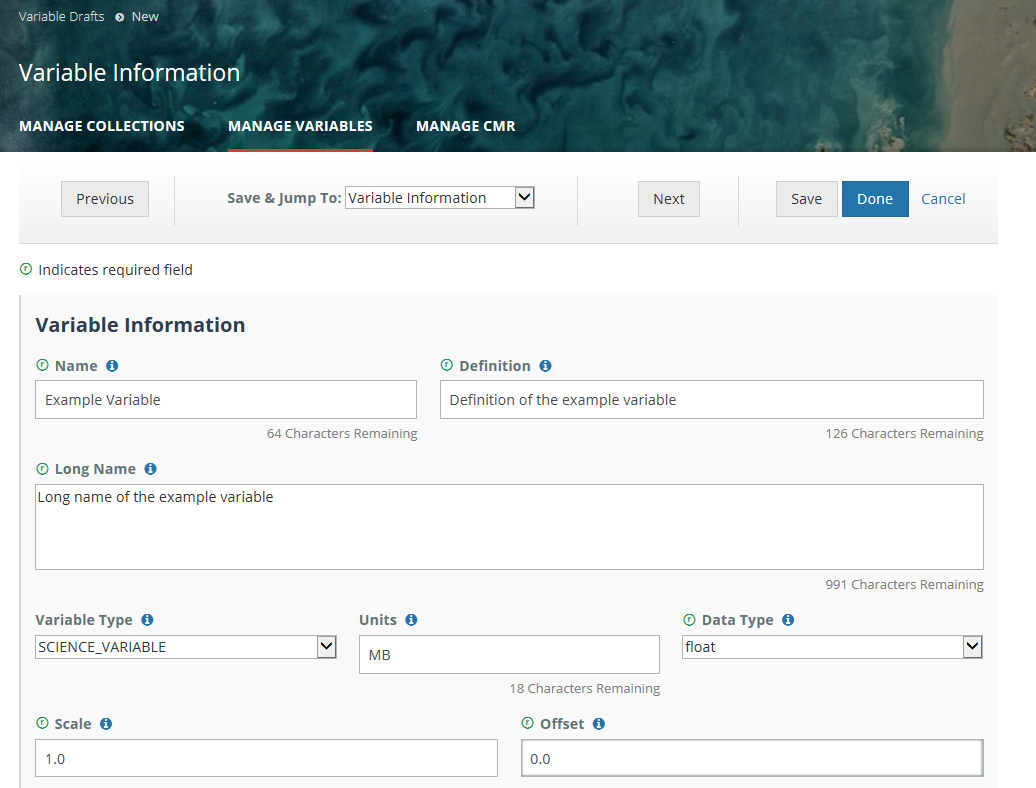
3. Navigate from form to form using the Previous or Next buttons, or by choosing the next form to edit from the pull-down list at 'Save & Jump To:'. You may work on forms in any order. When you move from one form to another, your input from the previous form will be saved in your draft record.

4. Explicitly Save form input (within a session or at the end of a session) with the 'Save' button; Finish editing your draft record using the 'Done' button.
NOTE: When you are working with a draft variable record, all 'Save' and 'Done' operations update the draft record in the MMT database, not in the CMR, i.e., DRAFT records are not stored in the CMR. Your draft variable record will not be ingested into the CMR until you click on the 'Publish Variable Draft' button in step 7 below.
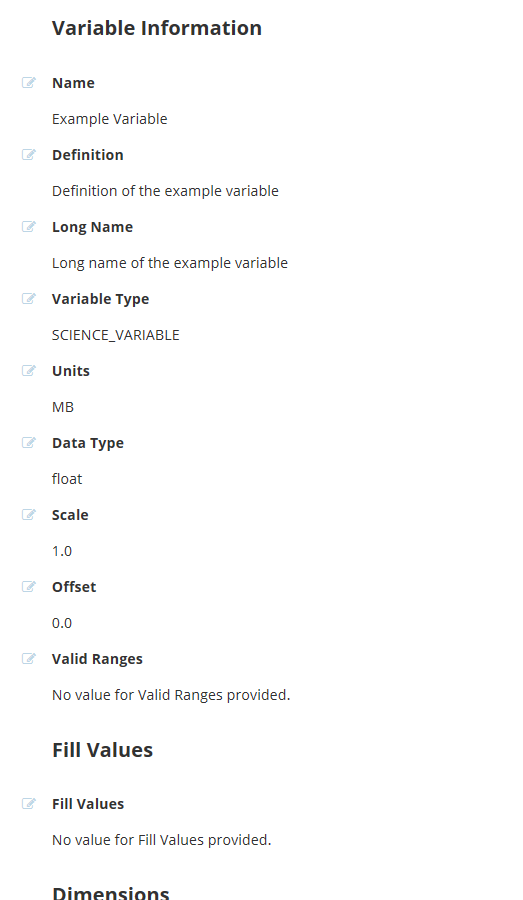
5. Follow progress of your draft record on the progress panel:

The icons on the progress panel have the following meanings:
6. View a HTML rendering of your collection record on the 'preview panel':
7. When all Required fields are complete with no validation errors (red icon) showing on the progress panel, you are ready to Publish your record to the CMR.
Click on the 'Publish Variable Draft' button above the Progress Panel on the draft record page:
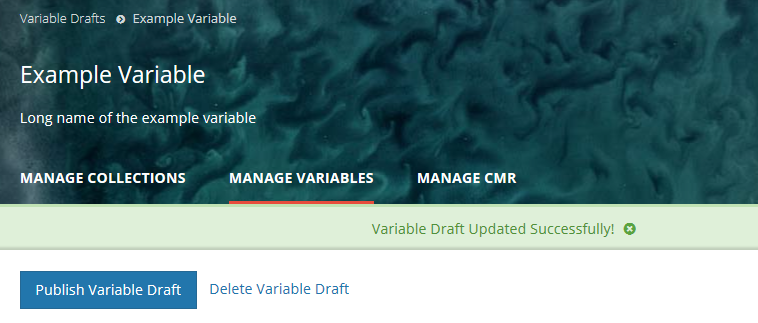
8. You will see a green banner indicating that your variable record has been successfully published to the CMR. You will also receive an email stating that your record has been published, and providing the 'concept id' (CMR identifier) for the published record. You may use that concept id to search for your record on the MMT.
Find and view variable records in the CMR
Use the 'Search Variables ' interface in the upper right corner of the MMT banner:
Find records based on a keyword
Enter a search term (a Variable Name, Variable Long Name, a CMR concept id, or a science keyword) in the white 'Enter Search Term' box, and click on 'Search Variables'.
A table of CMR variable records which match the search term will be presented (sorted by Name).

To view an html representation of the metadata for any variable record in the search results table, click on the Name of the Variable.
Find all variable records for a provider
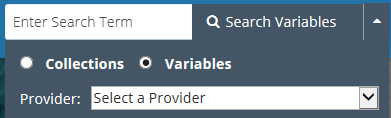
Select a provider from the 'Select a Provider' drop-down list, and then click on 'Search Variables'.
A table of all CMR variable records for the selected provider will be presented (sorted by Name).
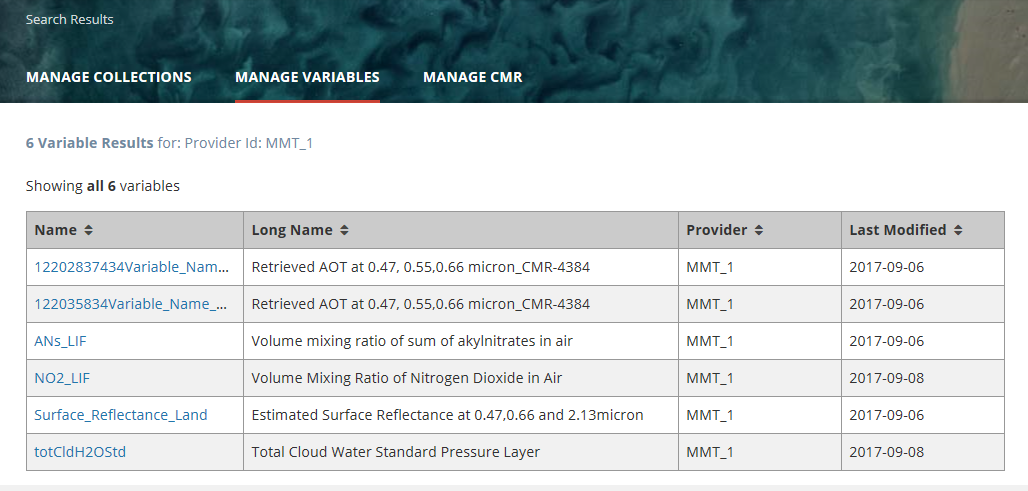
To view an html representation of the metadata for any variable record in the search results table, click on the Name of the variable in the search results table.
Update a variable record in the CMR for my provider
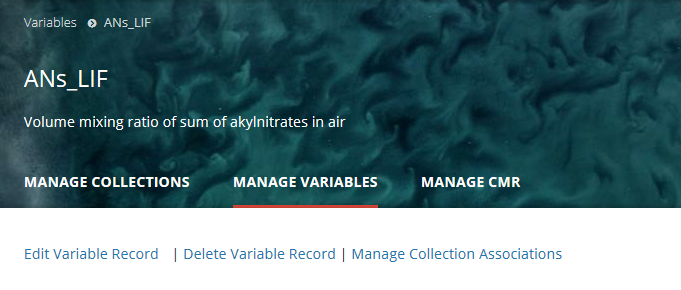
- Find the variable record using the instructions above (Find and view variable records in the CMR), and click on the Name of the variable in the search results table to view the variable display page.
- At the top of the variable display page, click on 'Edit Variable Record'
3. A new draft of this record will be created in the MMT database. The MMT will display the progress panel (and html representation) for the draft record.

4. On the progress panel, click on any section to begin editing the draft record. Use the progress panel and navigation buttons described above (Create a variable record in the CMR for my provider) to update the metadata in the draft record.
5. When you have finished editing the draft record, publish it to the CMR by clicking on the 'Publish Variable Draft' button above the progress panel. This will create a new revision of the variable record in the CMR. The CMR stores up to 10 revisions of each variable record. When an 11th revision is created, the first revision is deleted, and so on. Each revision of a variable record has the same concept id as the original variable record.

Delete a variable record in the CMR for my provider
- Find the variable record using the instructions above (Find and view variable records in the CMR), and click on the Name of the variable in the search results table to view the variable display page.
- At the top of the variable display page, click on 'Delete Variable Record'
3. You will see a pop-up message asking you to confirm the variable record deletion.
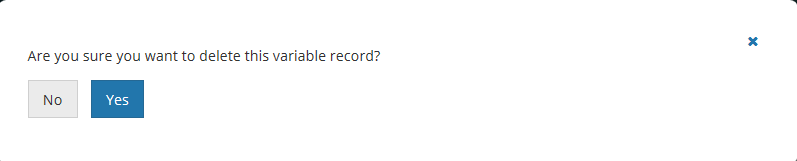
4. Click on Yes to delete the variable record. The MMT will then display a 'Variable Deleted Successfully!' message.

Associate a Variable with one or more Collections for my provider
- Find the variable record using the instructions above (Find and view variable records in the CMR), and click on the Name of the variable in the search results table to view the variable display page.
At the top of the variable display page, click on 'Manage Collection Associations;
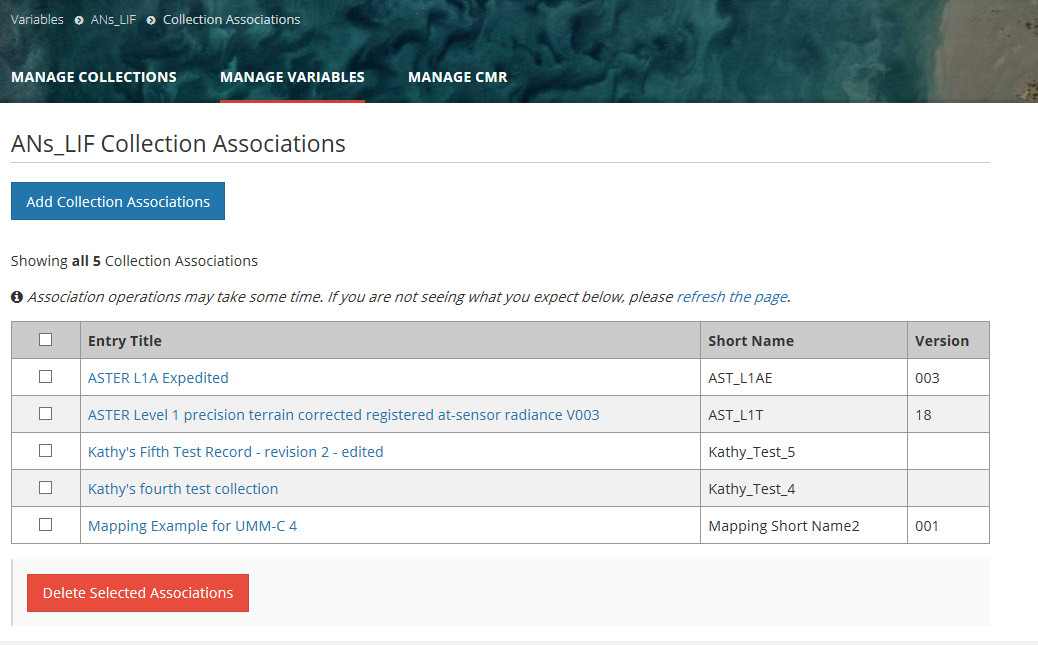
3. On the Collection Associations page, all collections already associated with this variable will be displayed in a table: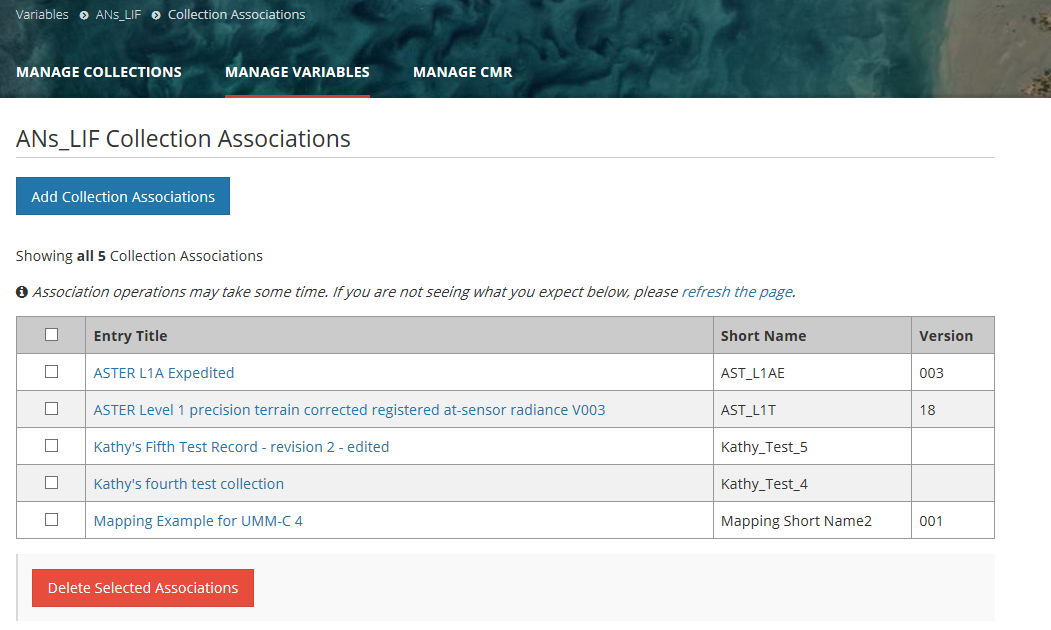
4. To add new collection associations, click on the 'Add Collection Associations' button.
5. A Collection Association Search page will be displayed. Choose a Search Field from the pull-down selections, and enter a Search Term (value) for that Search Field. Note that wildcard searches are supported for some search fields. (The text below the search field will tell you if wildcard searches are supported for that field.)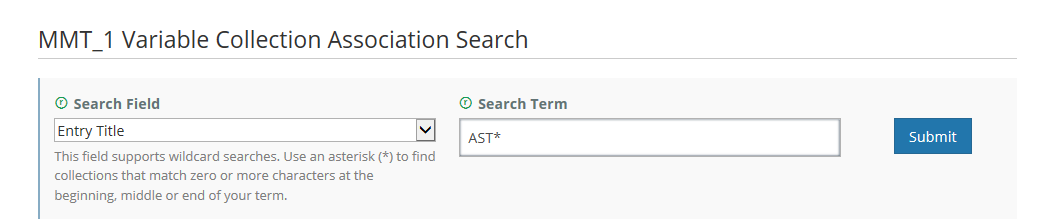
6. A table of collections matching the collection search criteria will be displayed. Any collections in the search results that are already associated with the variable will be present in the table but grayed out. Click on the checkbox beside each collection that you wish to associate with the variable (or click the checkbox in the table header to select all collections in the table), and click on Submit below the collection search results table. All selected collections will be associated with the variable.
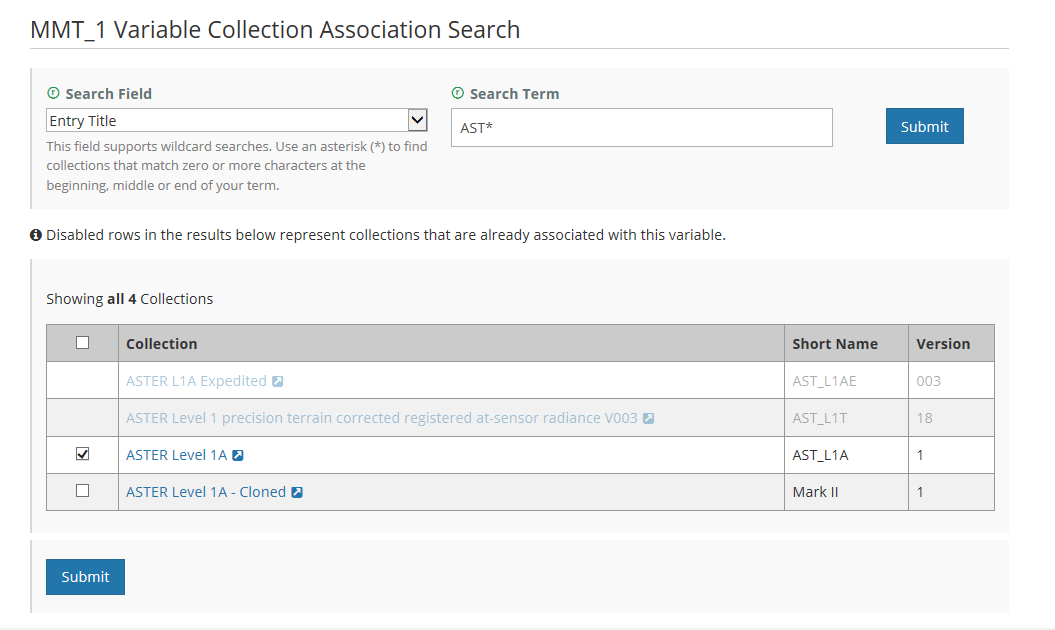
7. A Collection Associations results page will be displayed, showing all collections now associated with the Variable. This includes any prior associations plus the associations just completed.
NOTE: Because the collection / variable association operation is asynchronous, the results page may be displayed before all associations have completed. You may need to click on the 'refresh the page' link to see the final results of the collection association.

Disassociate a Variable with one or more Collections for my provider
- Find the variable record using the instructions above (Find and view variable records in the CMR), and click on the Name of the variable in the search results table to view the variable display page.
At the top of the variable display page, click on 'Manage Collection Associations;
- On the Collection Associations page, all collections already associated with this variable will be displayed in a table:
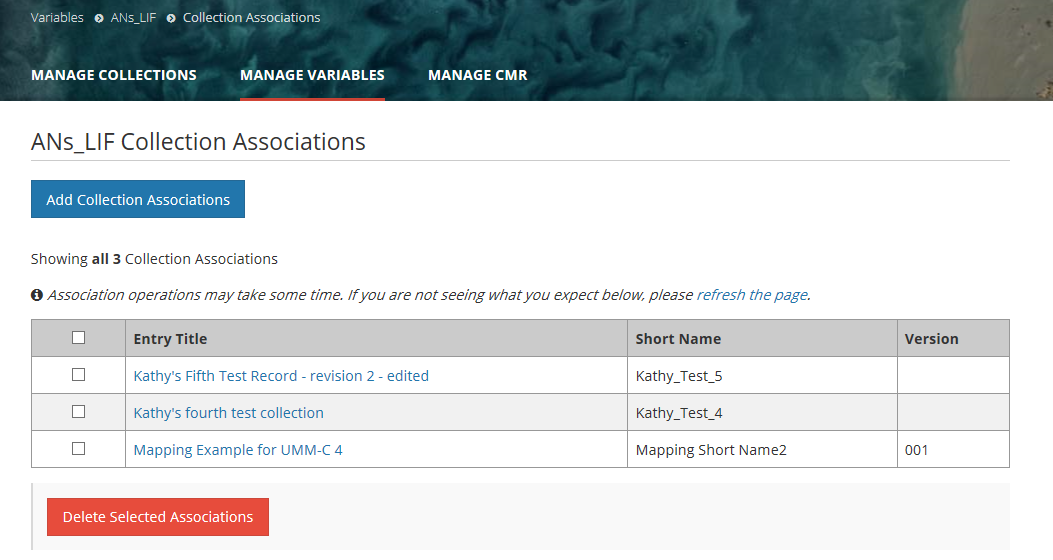
- Click the checkbox beside each collection whose association to this variable you wish to delete (or click the checkbox at the top of the table to select all collections in the table).
- Click on 'Delete Selected Associations'.
- A Collection Association results page will be displayed, showing all collections still associated with the variable.
NOTE: Because the collection / variable disassociation operation is asynchronous, the results page may be displayed before all disassociations have completed. You may need to click on the 'refresh the page' link to see the final results of the collection disassociation.
Find which Collections are associated with a Variable
- Find the variable record using the instructions above (Find and view variable records in the CMR), and click on the Name of the variable in the search results table to view the variable display page.
At the top of the variable display page, click on 'Manage Collection Associations;
- On the Collection Associations page, all collections already associated with this variable will be displayed in a table:
Produce a Holdings Report for my provider
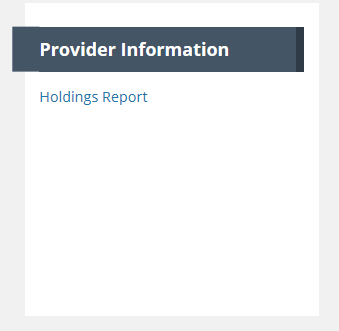
- On the 'Manage CMR' dashboard, under Provider Information, click on 'Holdings Report'.
- A table of providers and their holding summaries will be displayed.

- Click on the name of a provider in the table to see the detailed holdings for that provider. For example:
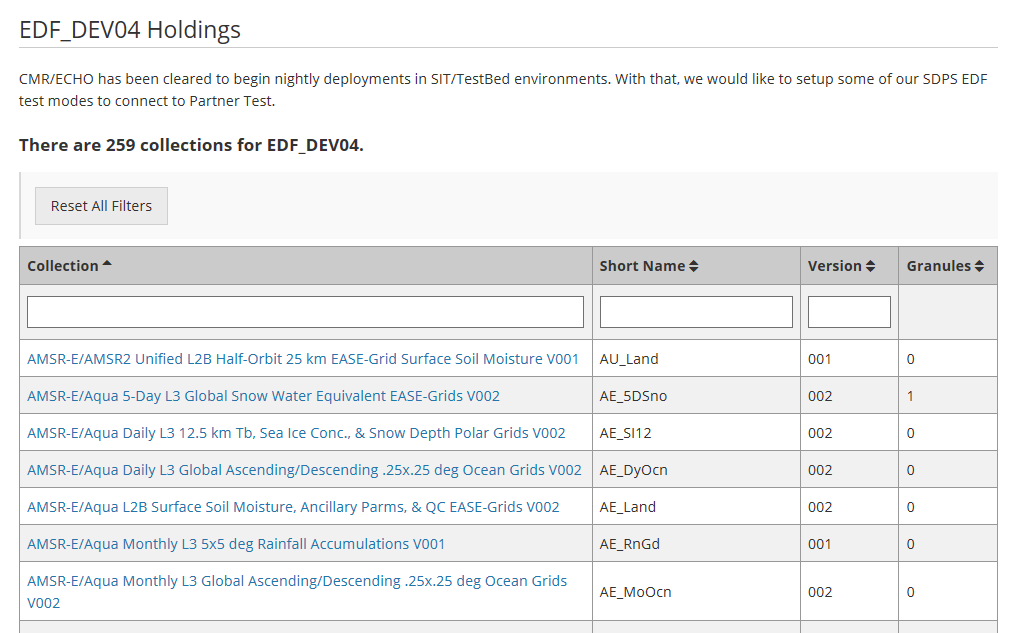
4. Use the sort and filter features on the above table to find specific collections or sets of collections for the provider.

Manage Groups for my provider
Recommended set-up for a provider:
- Each provider should have an administrator group, whose members will have full privileges for the provider. Normally this group is called 'Administrator Group'. The CMR OPS team will establish this group and its Provider Object Permissions when they set up your provider.
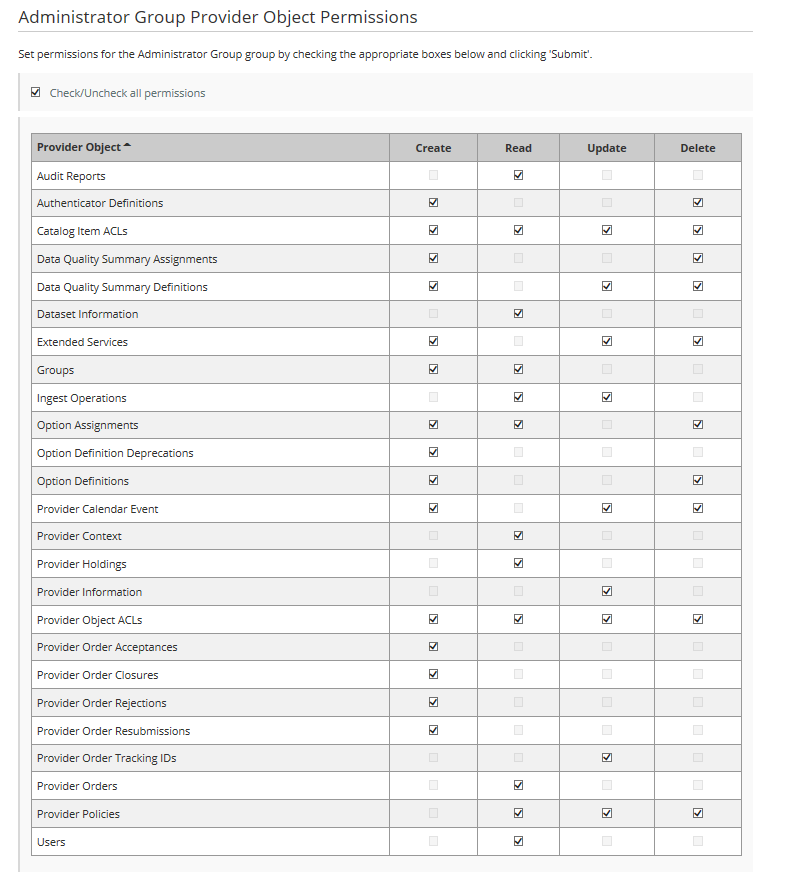
Provider Object Permissions for the Administrator Group are as follows:
2. Each provider may also establish Groups of registered users who will have Search and Order access to specified sets of your collections (this access is granted through Collection Permissions, described in the next section of this User's Guide).
(e.g., instrument team group with access to collections from that instrument)
Create a New User Group
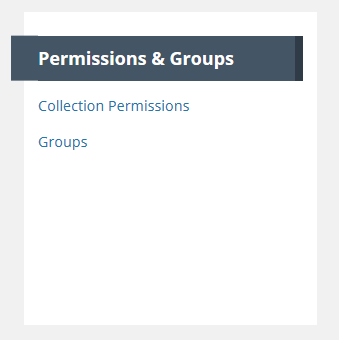
- On the 'Manage CMR' dashboard, under 'Permissions & Groups', click on 'Groups'
At the top of the Group page, click on 'Create a Group'

3. A blank group page will be displayed.
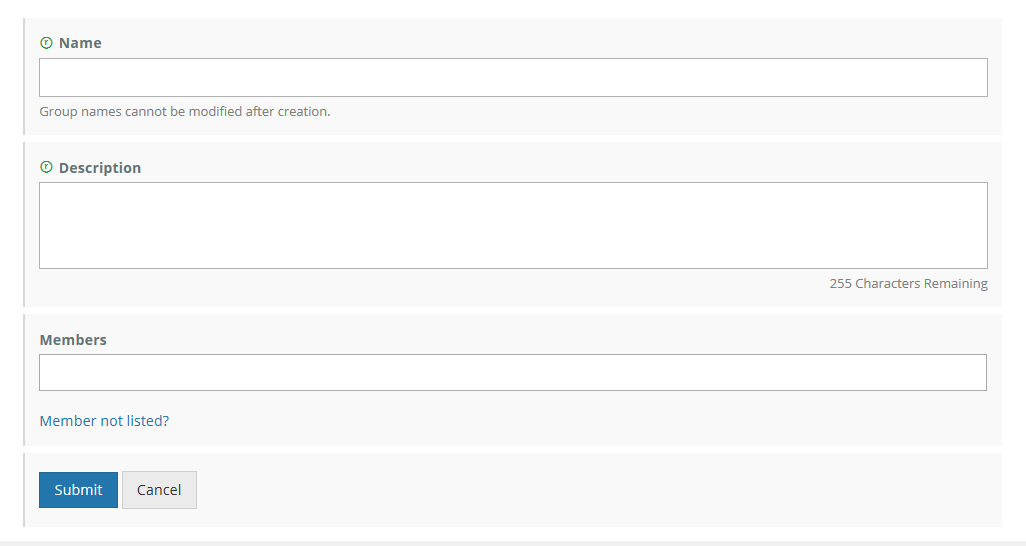
4. Fill in the Group Name (recommended to make the name descriptive of the group purpose) and Description.
5. Add members to the group. Group members must have URS login ids in the environment where the group is being created (SIT, UAT, PROD). To add members to the group, position your cursor in the 'Members' box and begin typing the member's URS login id or URS name.
After you have typed 3 characters, the MMT will suggest members for you, and you can choose from the suggested member list.

Enter all group members in the 'Members' field, then click on 'Submit' to save your group.
View a User Group
- On the 'Manage CMR' dashboard, under 'Permissions & Groups', click on 'Groups'
2. A table of groups that you are permitted to see will be displayed. You may filter that table by Provider

or by User (group member)

Click on 'Apply Filters' to filter the table.
3. From the resulting table of groups, select the group you wish to view by clicking on the Group Name for the group.
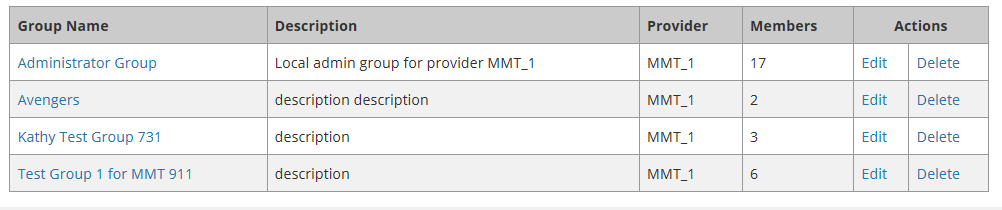
4. The Group information page will be displayed. The page shows the group name, group description, all Collection Permissions associated with the group (see next section of this User's Guide for a discussion of Collection Permissions), and a table of group members.
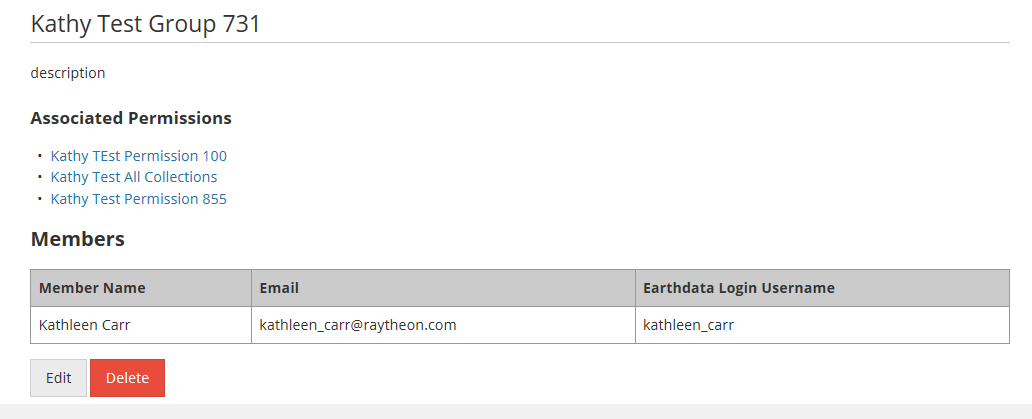
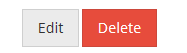
5. You may Edit or Delete the group from the group display page using the Edit or Delete buttons at the bottom of the page,
See the next two sections for instructions on how to Edit or Delete a Group.
Edit a User Group
- On the 'Manage CMR' dashboard, under 'Permissions & Groups', click on 'Groups'
2. A table of groups that you are permitted to see will be displayed. You may filter that table by Provider
or by User (group member)
Click on 'Apply Filters' to filter the table.
3. From the resulting table of groups, select the group you wish to update by clicking on the 'Edit' Action in the row with the group name, OR you may click on the Group Name itself and use the Edit button on the group display page described in the previous section.
4. The Edit page for the group will be displayed. The Group Name may not be modified after the group has been created. However, you may modify the group description and/or the group membership

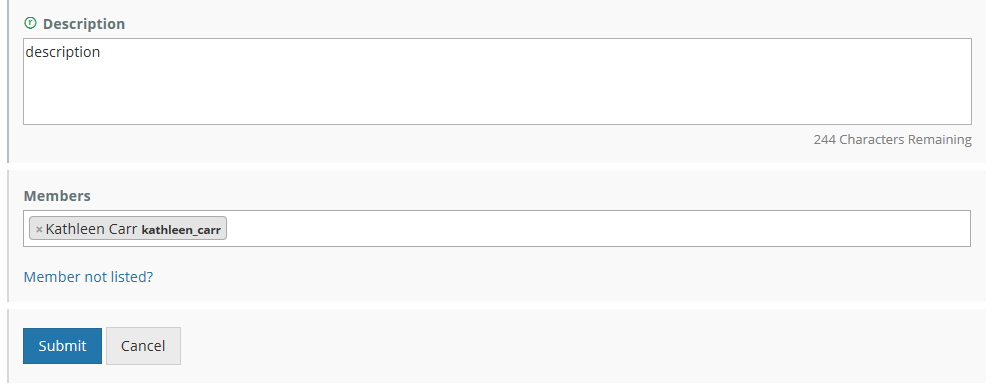
5. To remove a member from the group, click on the 'x' to the left of the member name. To add a member to the group, position your cursor in the 'Members' box and begin typing the member's URS login id or URS name.
After you have typed 3 characters, the MMT will suggest members for you, and you can choose from the suggested member list.
6. After you have finished editing the group, click on 'Submit' to save your changes.
Delete a User Group
- On the 'Manage CMR' dashboard, under 'Permissions & Groups', click on 'Groups'
2. A table of groups that you are permitted to see will be displayed. You may filter that table by Provider
or by User (group member)
Click on 'Apply Filters' to filter the table.
3. From the resulting table of groups, select the group you wish to delete by clicking on the 'Delete' Action in the row with the group name, OR you may click on the Group Name itself and use the Delete button on the group display page described in the 'Edit a Group' section of this User's Guide.
4. You will see a pop-up message asking you to confirm the group deletion:
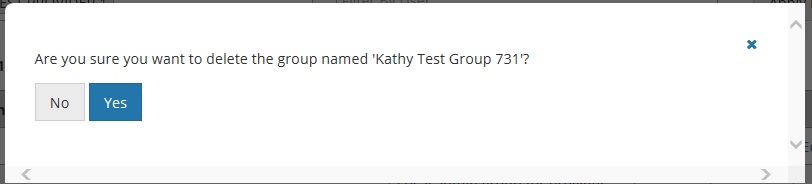
5. Click on Yes to delete the group. The MMT will then display a 'Group successfully deleted.' message, and the group will no longer appear in the table of groups for your provider.

Manage collection and granule permissions for my provider
Recommended set-up for a provider:
- An 'All Collections' permission to be set-up by the OPS team, granting Search and Order permissions for All Collections for the provider to members of one or more 'privileged' groups, e.g., the Administrators group
- An 'All Granules' permission to be set-up by the OPS team, granting Search and Order permissions for All Collections for the provider to members of one or more 'privileged' groups, e.g., the Administrators group
- Permissions for only 'Selected Collections' - to be set up by the provider Administrator, granting search and order permissions for a specified set of provider collections and/or granules to members of a provider group. Common examples are: 1) 'Public Collections' permissions which grant search and order permissions to a set of provider collections and/or granules to All Registered Users; and 2) <instrument> permissions which grant search and order permissions to collections from a specific instrument to a group of instrument scientists.
Define user permissions for a set of collections for my provider
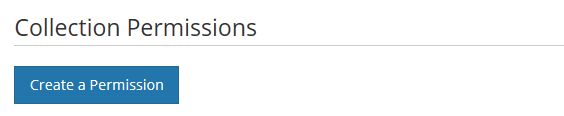
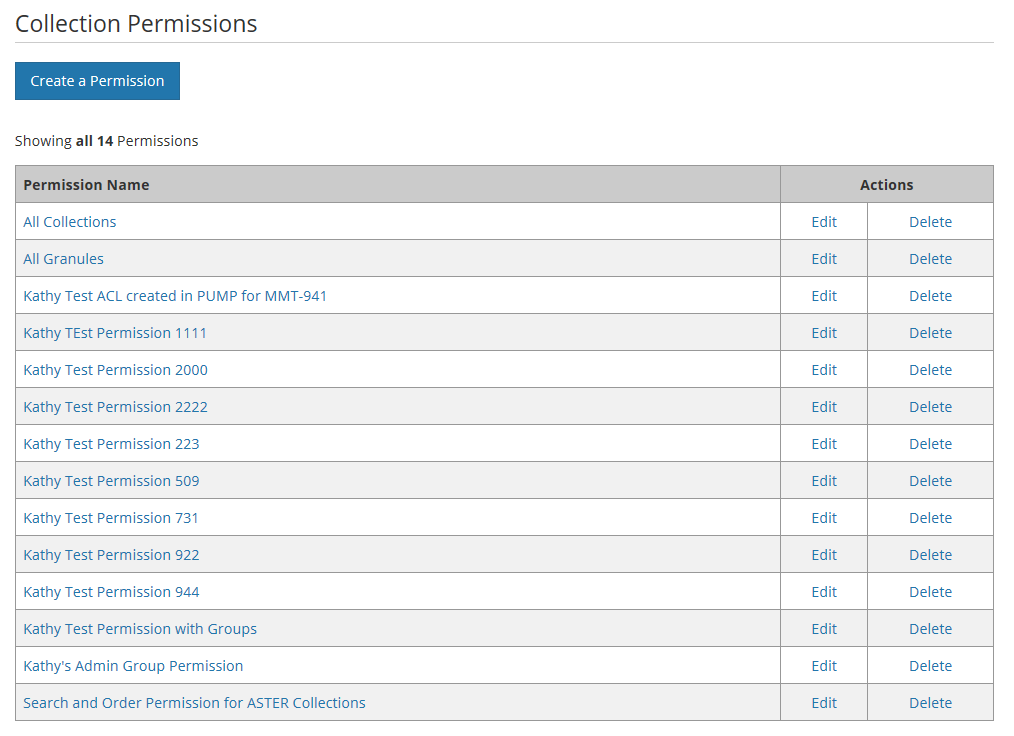
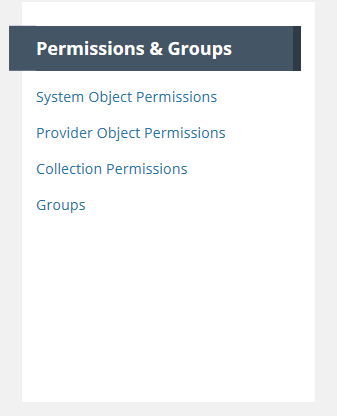
- On the 'Manage CMR' dashboard, under 'Permissions & Groups', click on 'Collection Permissions'
2. On the Collection Permissions page, click on 'Create a Permission'.
3. Name your collection permission (it is recommended to choose a name descriptive of the type of permission and the type of collections to which the permission applies), and select whether the permission applies to collections, granules, or both.

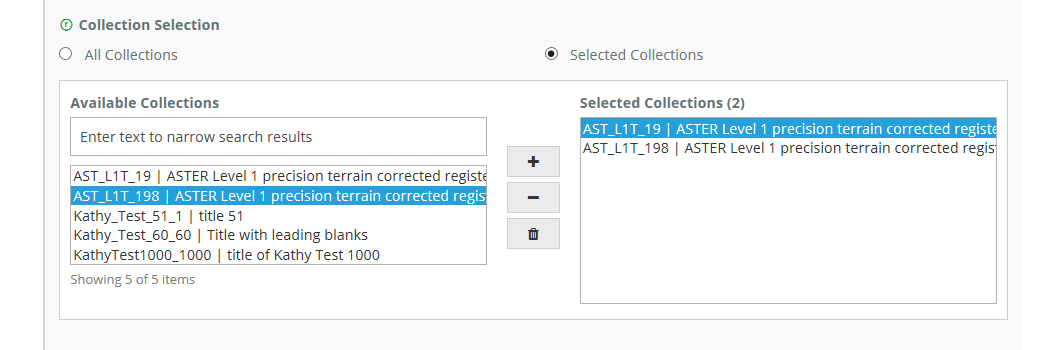
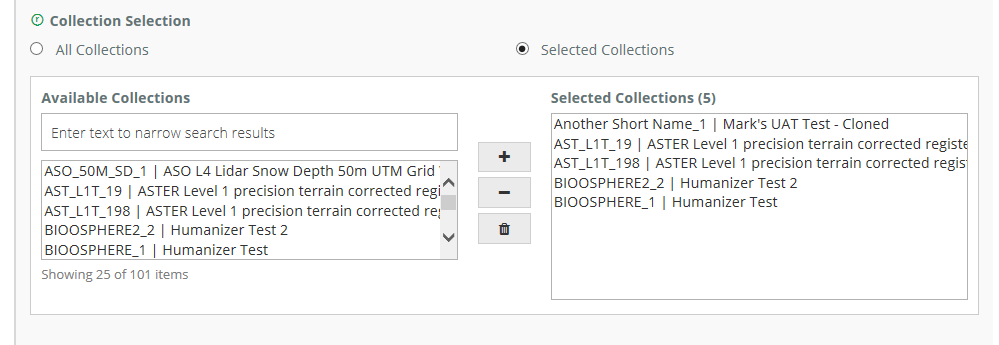
4. Click on the 'Selected Collections' radio button, and assign collections to your permission.
Choose specific collections to which the permission applies, by highlighting collection names on the left side of the collection 'chooser' and clicking on the '+' to add the collection to the permission. You may use the SHIFT key to highlight multiple collections at one time.
To remove a collection from the permission, highlight the collection name on the right side of the chooser, and click on the '-' to remove it. You may highlight more than one collection on the right and click on the trashcan icon to remove all highlighted collections from the permission.
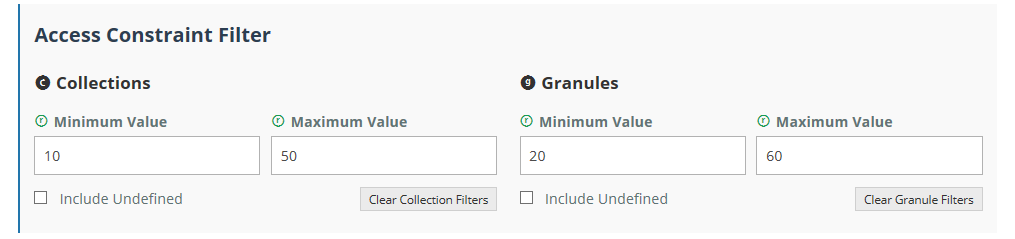
5. OPTIONAL: Further qualify the collections or granules in the permission by specifying only collections with Access Constraint values in their metadata within a specified range. (use the Access Constraints subform on the Data Identification form to enter these values in a collection record using the MMT). Click on the 'Include Undefined' checkbox if you want to also include collections that have no value for Access Constraint.
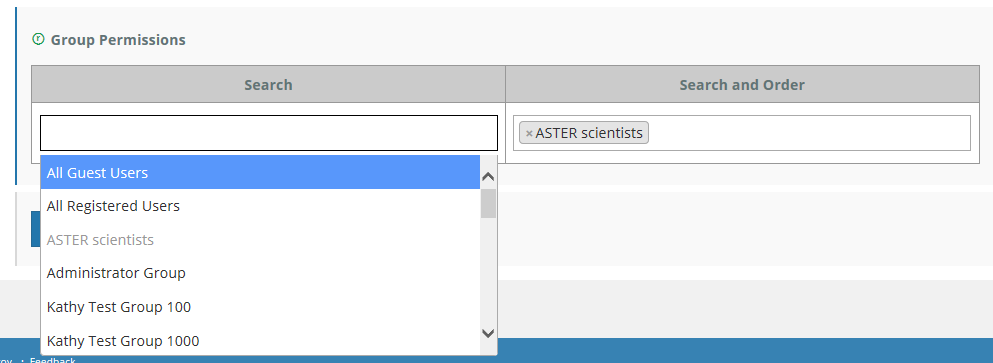
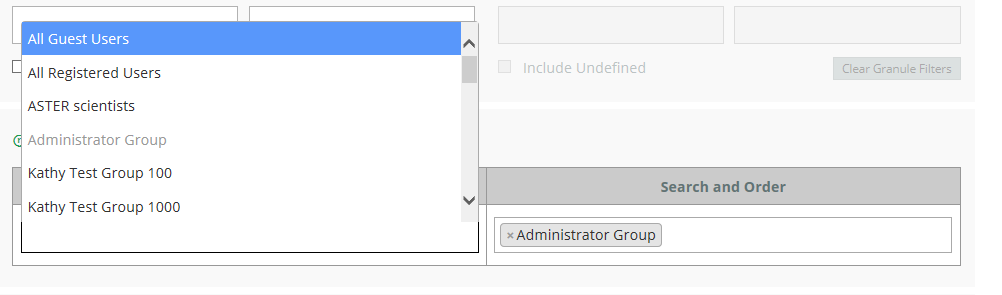
6. Assign the groups of users who have Search or Search and Order permissions for these collections. (Search and Search and Order permissions apply when a user uses a client like Earthdata Search Client to search for a collection record and to order granules from that collection.) When you position your cursor in the Search box or in the Search and Order box, you will see a pull-down list of existing groups for your provider. The list will also include two standard 'system' groups: All Guest Users, and All Registered Users. (Registered Users are users who have an Earthdata Login account). If you choose a group for Search, that group will not be available to choose for Search and Order, and vice versa. Click on a group name under Search to give users in that group Search privileges for the collections in this permission. Click on a group name under Search and Order to give users in that group Search and Order privileges for the collections in this permission. You may select multiple groups for Search and multiple groups for Search and Order.
NOTE: One use case here is to allow All Registered Users or All Guest Users to search for and order granules in Version n+1 collections, but not allow those users to search for and order granules in Version n collections. To do this, create a Collection Permission with Selected Collections, choose only your Version n+1 collections, and choose the All Guest Users or All Registered Users group appropriately. Make sure that there is no permission that grants access to Version n collections to All Guest Users / All Registered Users.
7. Click Submit to create your collection permission.
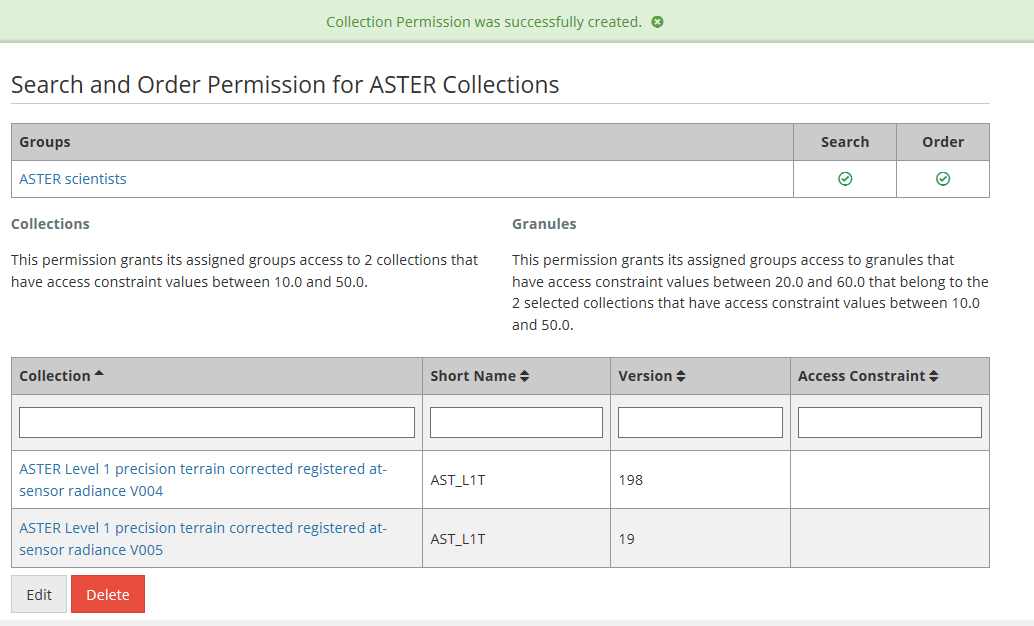
8. You will see a green banner indicating that your collection permission was created successfully, and you will also see a display page for your collection permission.
Edit users in a Collection Permission for my provider
- On the 'Manage CMR' dashboard, under 'Permissions & Groups', click on 'Collection Permissions'
2. On the list of Collection Permissions for your provider, choose the Collection Permission you wish to update by clicking on the Edit Action in the row for the permission, or by clicking on the permission name, and then clicking the Edit button on the display page for the permission.
3. On the Edit page for the Collection Permission, at the bottom of the page in the 'Group Permissions' section, add or remove groups of users for the Collection Permission. To add a group for Search or Search and Order, place your cursor in the box under Search or Search and Order, and select an additional group from the pick list. To remove a group from Search or Search and Order, click the 'x' beside the group name.
4. Click on the Submit button at the bottom of the Edit page to save the changes to the Collection Permission.
Edit collections in a Collection Permission for my provider
- On the 'Manage CMR' dashboard, under 'Permissions & Groups', click on 'Collection Permissions'
2. On the list of Collection Permissions for your provider, choose the Collection Permission you wish to update by clicking on the Edit Action in the row for the permission, or by clicking on the permission name, and then clicking the Edit button on the display page for the permission.
3. On the Edit page for the Collection Permission, in the 'Collection Selection' section, use the collection chooser to add or collections from the Collection Permission.
4. Click on the Submit button at the bottom of the Edit page to save the changes to the Collection Permission.
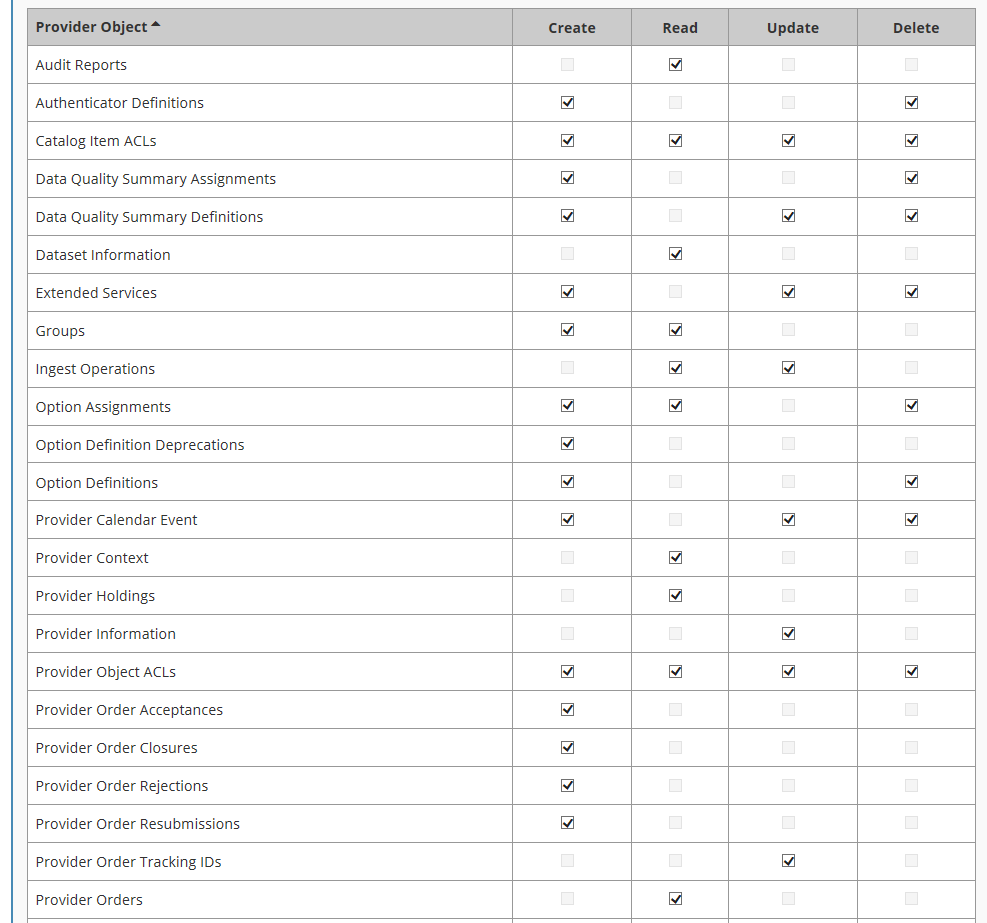
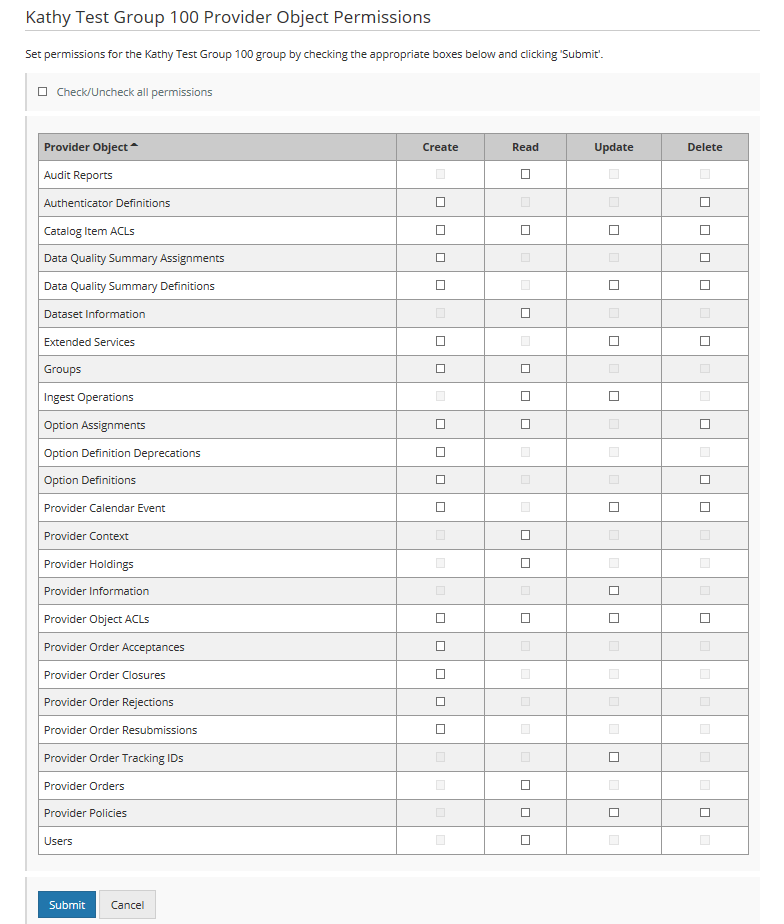
Manage 'Provider Object Permissions' for a user group
NOTE: You must have Administrator privileges for your provider to perform this operation.
For a description of what Provider Object Permissions mean, and how they should be set, see:
CMR Data Partner User Guide#ProviderObjectsvs.CatalogItems
- On the 'Manage CMR' dashboard, under 'Permissions & Groups', click on 'Provider Object Permissions'
2. A table showing all Groups for your provider will be displayed:
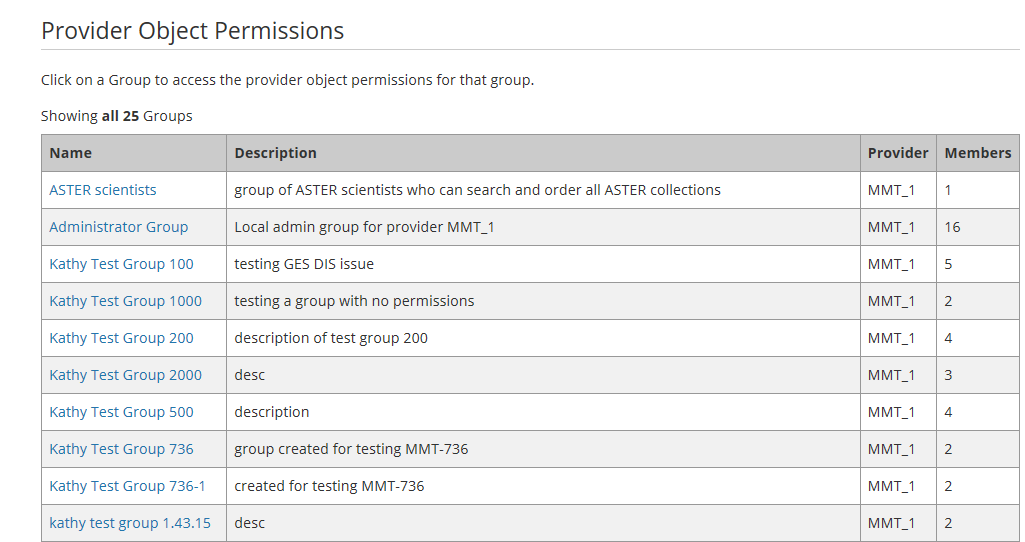
3. Click on the Name of a group in the table to edit the Provider Object Permissions for that group. A table of Provider Objects for that group, with Create, Read, Update, and Delete permissions, will be displayed. Check all appropriate boxes in the table and then click the 'Submit' button at the bottom of the page to save the changes.
Manage 'System Object Permissions' for a user group
NOTE: You must have System Administrator privileges to perform this operation.
- On the 'Manage CMR' dashboard, under 'Permissions & Groups', click on 'System Object Permissions'
Manage Ordering for my provider
Define Order Policies for my provider
- Track Orders for my provider
- Manage Order Options for my provider
- Create an Order Option
- Find an Order Option
- Update an Order Option
- Delete an Order Option
- Assign an Order Option to Collections
- View existing Order Option to Collection assignments
- Manage Service Options for my provider
- Create a Service Implementation
- Create a Service Option
- Find a Service Option
- Update a Service Option
- Delete a Service Option
- Assign a Service Option to Collections
- View existing Service Option to Collection assignments
Manage Data Quality Summaries for my provider
A Data Quality Summary is a named object consisting of text that describes the quality of data in a collection or collections.
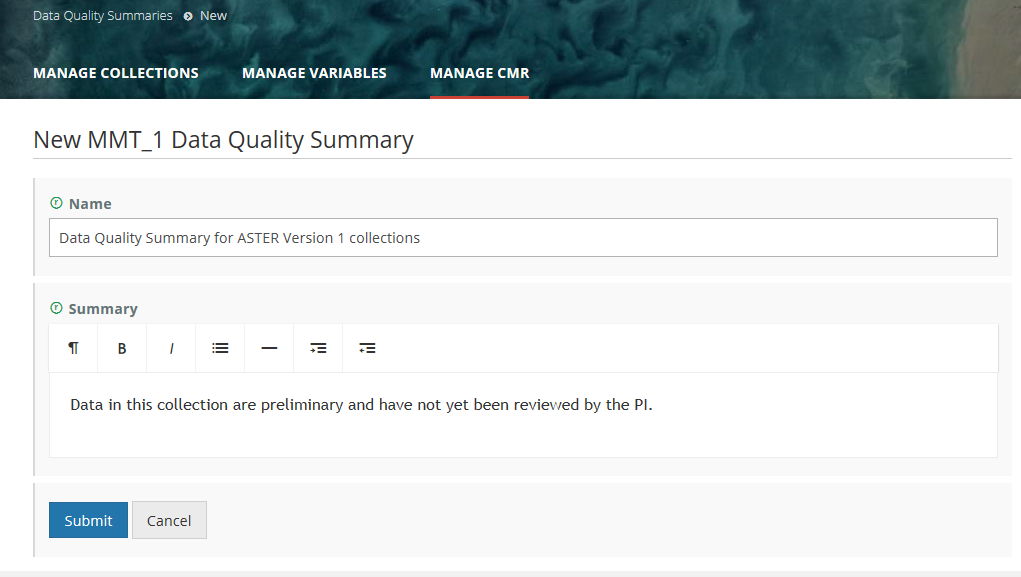
Create a Data Quality Summary
- On the 'Manage CMR' dashboard, under 'Data Quality Summaries', click on 'Create a Summary'.

- On the Data Quality Summaries page, enter a Name for your Data Quality Summary, and enter the Data Quality Summary text. Click on Submit.
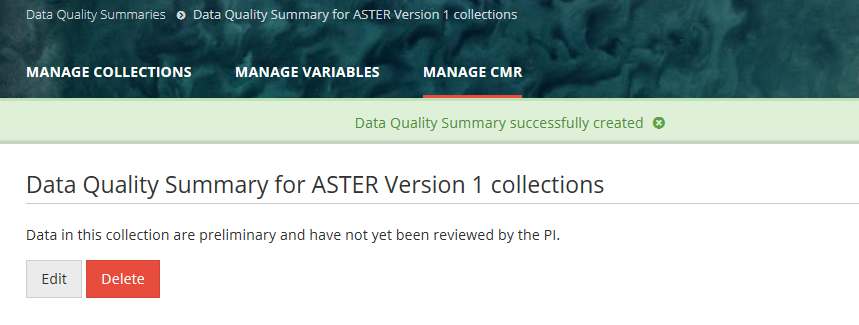
3. The MMT will display the Data Quality Summary display page, with a green banner indicating that the Data Quality Summary was created successfully (or a pink banner indicating a failure creating the Data Quality Summary).
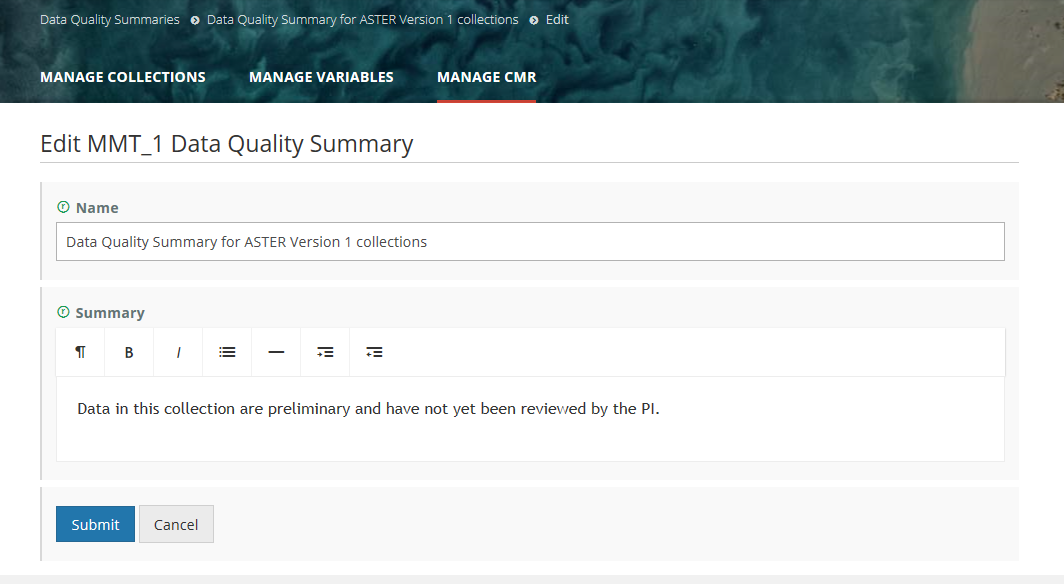
Update a Data Quality Summary
- On the 'Manage CMR' dashboard, under 'Data Quality Summaries', click on 'View Summaries'..
2. The MMT will display a table of Data Quality Summaries for your provider.
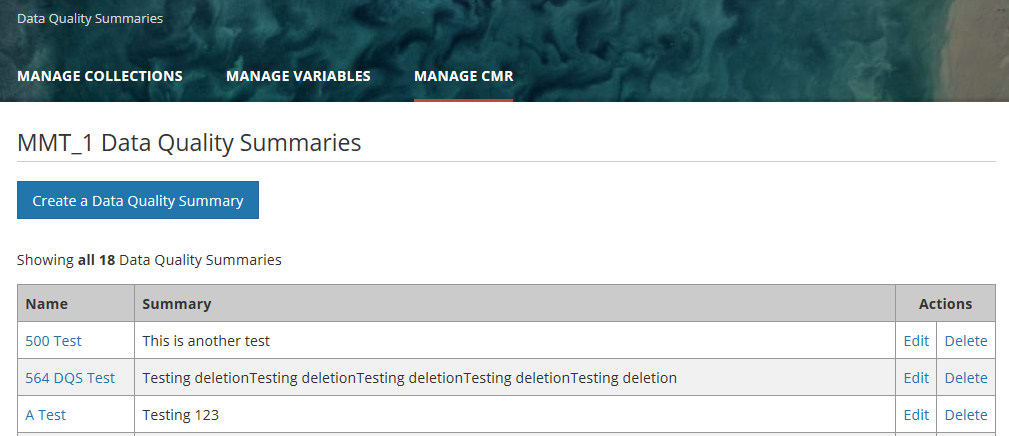
3. Select the Data Quality Summary you wish to update and click on the Edit action for that Data Quality Summary. (or you may click on the Name of the Data Quality Summary, and then click on the Edit button on the display page for that Data Quality Summary).
4. On the Edit page for the Data Quality Summary, update the Name and/or Summary fields as needed, and click Submit.
Delete a Data Quality Summary
- On the 'Manage CMR' dashboard, under 'Data Quality Summaries', click on 'View Summaries'..
2. The MMT will display a table of Data Quality Summaries for your provider.
3. Select the Data Quality Summary you wish to update and click on the Delete action for that Data Quality Summary. (or you may click on the Name of the Data Quality Summary, and then click on the Delete button on the display page for that Data Quality Summary).
4. You will be asked to confirm the deletion:
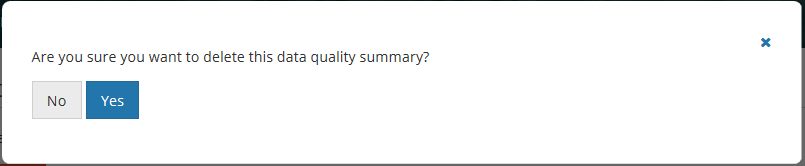
5. Click on 'Yes' to confirm the deletion. The MMT will display a success message if the DQS is deleted:

NOTE: If the DQS is assigned to collections, you will not be able to delete the DQS until you have deleted its associations to collections first.
Assign a Data Quality Summary to Collections
- On the 'Manage CMR' dashboard, under 'Data Quality Summaries', click on 'Create a Summary Assignment'.
2. On the page for creating the Data Quality Summary Assignment, choose a Data Quality Summary for your provider from the drop down list, and then use the collection chooser to select one or more collections to associate with the Data Quality Summary. Click on Submit to assign the Data Quality Summary to the selected collections.
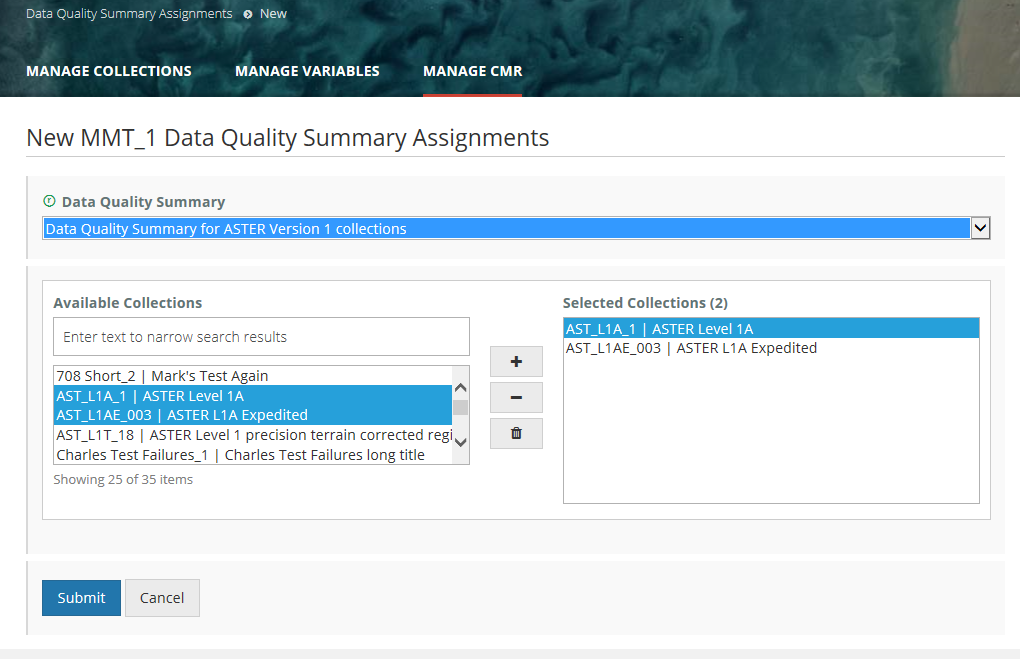
3. MMT will display a success or failure message for the Data Quality Summary assignment operations.

View existing Data Quality Summary to Collection assignments
Report problems or get help with MMT
- Use the Feedback link on the top right of the black 'Tophat' MMT page header to report problems or get help with the MMT.

- Send email to support@earthdata.nasa.gov
Related articles